
Unlike traditional hydroponic systems that demand constant monitoring and complex equipment, the Kratky Method works quietly in the background. Plants grow in a nutrient solution that decreases naturally as roots develop. The result is a self-regulating system that practically runs itself from seedling to harvest.
This guide walks you through everything needed to start your first Kratky hydroponic garden. Whether you want fresh lettuce for salads or aromatic basil for cooking, this method makes it achievable without breaking the bank or your schedule.
What Is the Kratky Method?

The Kratky Method is a passive hydroponic technique developed by Dr. Bernard Kratky at the University of Hawaii. This non-circulating water culture system allows plants to grow without electricity or pumps. The method stands out for its simplicity among hydroponic systems.
Plants sit suspended above a reservoir filled with nutrient solution. As plants absorb water and nutrients, the water level drops naturally. This creates an expanding air gap between the water surface and the base of the plant. Roots hanging in this space get the oxygen they need while roots below remain submerged for water and nutrient uptake.
The beauty of this method lies in its passive nature. No mechanical aeration or circulation is needed. The system balances itself as plants grow. When fast-growing crops like lettuce reach maturity, the nutrient solution is nearly depleted. This self-limiting characteristic makes the Kratky Method ideal for leafy greens and herbs.
How It Differs From Deep Water Culture
Many people compare the Kratky Method to Deep Water Culture (DWC) systems. Both suspend plant roots in nutrient solution, but key differences exist. DWC requires an air pump to continuously oxygenate the water. This means electricity costs and equipment that can fail.
The Kratky Method eliminates these complications. As the water level drops, roots naturally access oxygen from the air gap. No pumps mean no noise, no power consumption, and no risk of crop loss from equipment failure.
Who Invented the Kratky Method?
Dr. Bernard Kratky developed this technique while researching low-cost food production methods suitable for developing regions. His goal was creating a hydroponic system that anyone could use without expensive equipment or technical knowledge.
The method gained popularity among home gardeners and small-scale farmers seeking simple hydroponic solutions. Its effectiveness for growing leafy greens made it particularly valuable for urban agriculture and food security initiatives worldwide.

Advantages and Disadvantages of the Kratky Method
Every growing method has strengths and limitations. Understanding these helps you decide if the Kratky Method fits your goals and situation. Let’s examine what makes this system appealing and where it faces challenges.
Advantages
- No electricity required means zero power costs and complete energy independence
- Minimal equipment investment makes it accessible for tight budgets
- Silent operation without noisy pumps or fans disturbing your space
- Low maintenance with no daily tasks once properly set up
- Perfect for beginners with straightforward setup and operation
- Scalable from single jars to multiple containers as needed
- Reduced pest problems compared to soil gardening
- Water efficient with minimal waste or evaporation
- No weeding required unlike traditional gardens
- Can be used indoors or outdoors with proper covering
- Failure-proof design with no mechanical parts to break
- Great for teaching kids about plant biology and hydroponics
Disadvantages
- Best suited for leafy greens and herbs rather than fruiting crops
- Limited to small-scale production not ideal for commercial volume
- Requires initial pH and nutrient adjustment before planting
- Each container needs individual attention and maintenance
- Difficult to correct mistakes once plants are established
- Temperature fluctuations can affect plant growth and health
- Not suitable for long-term crops with extended growth cycles
- Pests like mosquitoes may be attracted to standing water
- Algae growth possible if light reaches nutrient solution
- Requires covering to protect from rain and debris
- Individual containers become tedious when scaling up
- Limited ability to adjust nutrients mid-growth cycle

Best Use Cases for Kratky Method
This system shines in specific situations. Home gardeners wanting fresh salad greens year-round find it perfect. Urban dwellers with limited space appreciate its compact footprint. Teachers use it for educational demonstrations about plant growth and hydroponics.
Small restaurants and food trucks benefit from growing herbs and specialty greens on-site. The method works excellently for testing plant varieties before committing to larger hydroponic systems. Anyone wanting to try hydroponics without significant investment should start here.
However, commercial growers producing at scale will find the individual container approach too labor-intensive. Those wanting to grow tomatoes, peppers, or cucumbers need more robust systems with continuous nutrient circulation. The Kratky Method targets simplicity over production volume.
Essential Materials and Tools You’ll Need
Starting with the Kratky Method requires gathering basic supplies. Most items are readily available at garden centers or online retailers. The good news is that nothing costs much, and many items you might already have at home can work perfectly.

Containers and Reservoirs
Your container holds the nutrient solution and supports the plant. Choose opaque containers to prevent algae growth. Light penetrating clear containers causes algae that competes with plants for nutrients.
Five-gallon buckets work great for larger plants like tomatoes. Quart-size mason jars suit lettuce and herbs perfectly. Food-grade plastic ensures no chemicals leach into your nutrient solution. Container size depends on plant type and expected root mass.
The container needs a lid to prevent water evaporation and keep debris out. Styrofoam sheets or plastic bucket lids work well. The lid must be sturdy enough to support the net pot and plant weight without sagging into the solution.
Net Pots and Growing Medium
Net pots hold plants while allowing roots to grow through into the nutrient solution. Sizes range from two to six inches in diameter. Match pot size to plant size. Lettuce does fine in two-inch pots while tomatoes need four-inch or larger pots.
Growing medium supports seedlings and provides stability. Popular options include hydroton clay pebbles, perlite, or rockwool cubes. Hydroton remains the favorite for its pH neutrality and reusability. The medium should be inert and not break down in water.
Hydroponic Nutrients
Plants need proper nutrition to thrive. Hydroponic nutrients contain all essential elements in the correct ratios. Avoid using fertilizers designed for soil as they lack necessary micronutrients for hydroponic growing.
Three-part nutrient systems offer flexibility for different growth stages. Simpler two-part solutions work fine for leafy greens and herbs. Look for nutrients specifically labeled for hydroponic use. Organic options exist but can be trickier to work with in passive systems.

Measurement Tools
- pH meter for testing solution acidity levels
- pH up and pH down solutions for adjustments
- EC or TDS meter for nutrient concentration
- Measuring cups for accurate nutrient mixing
- Pipettes or syringes for small adjustments
Setup Tools
- Drill with hole saw for cutting lid openings
- Permanent marker for labeling containers
- Scissors for trimming roots if needed
- Clean mixing bucket for preparing nutrients
- Stirring stick for thoroughly mixing solution
Optional Accessories
- Light-blocking sleeves for extra algae prevention
- Plant labels for tracking varieties and dates
- Thermometer for monitoring water temperature
- Notebook for recording growth observations
- Spray bottle for moistening growing medium
Get Your Complete Kratky Starter Kit
Skip the hassle of sourcing individual components. Our recommended starter kits include everything you need to begin growing with the Kratky Method right away. Perfect for beginners who want to start on the right foot.
Choosing the Right Container Size
Container size directly impacts plant health and growth potential. Too small and roots become cramped, limiting nutrient uptake. Too large and you waste space and nutrient solution. Matching container to plant type ensures optimal results.


Small Containers (Half Pint to Quart)
Perfect for herbs like basil, cilantro, and parsley. Lettuce varieties also thrive in quart jars. These containers fit easily on windowsills or small shelves. They hold enough solution for one complete growing cycle of fast-growing greens.
- Ideal for single herb plants
- Great for testing new varieties
- Easy to move and rearrange
- Minimal nutrient solution needed

Medium Containers (Half Gallon to Two Gallons)
Suitable for larger lettuce heads, Swiss chard, and kale. These containers provide enough nutrient solution for one full growth cycle without refilling. They balance space efficiency with adequate root room for medium-sized plants.
- Perfect for full-sized lettuce heads
- Accommodates multiple herb plants
- Good for leafy greens like spinach
- Manageable weight when full

Large Containers (Three to Five Gallons)
Necessary for fruiting plants like tomatoes, peppers, and cucumbers. These crops have extensive root systems and longer growing periods. Larger volume means less frequent monitoring and refilling of nutrient solution during growth.
- Required for tomatoes and peppers
- Supports long-term crop growth
- Reduces refill frequency
- Provides stability for tall plants
Container Material Considerations
Food-grade plastic buckets are the most common choice. They’re affordable, durable, and available everywhere. Black or dark-colored containers work best for blocking light from the nutrient solution. White containers can work but may require covering or light-blocking sleeves.
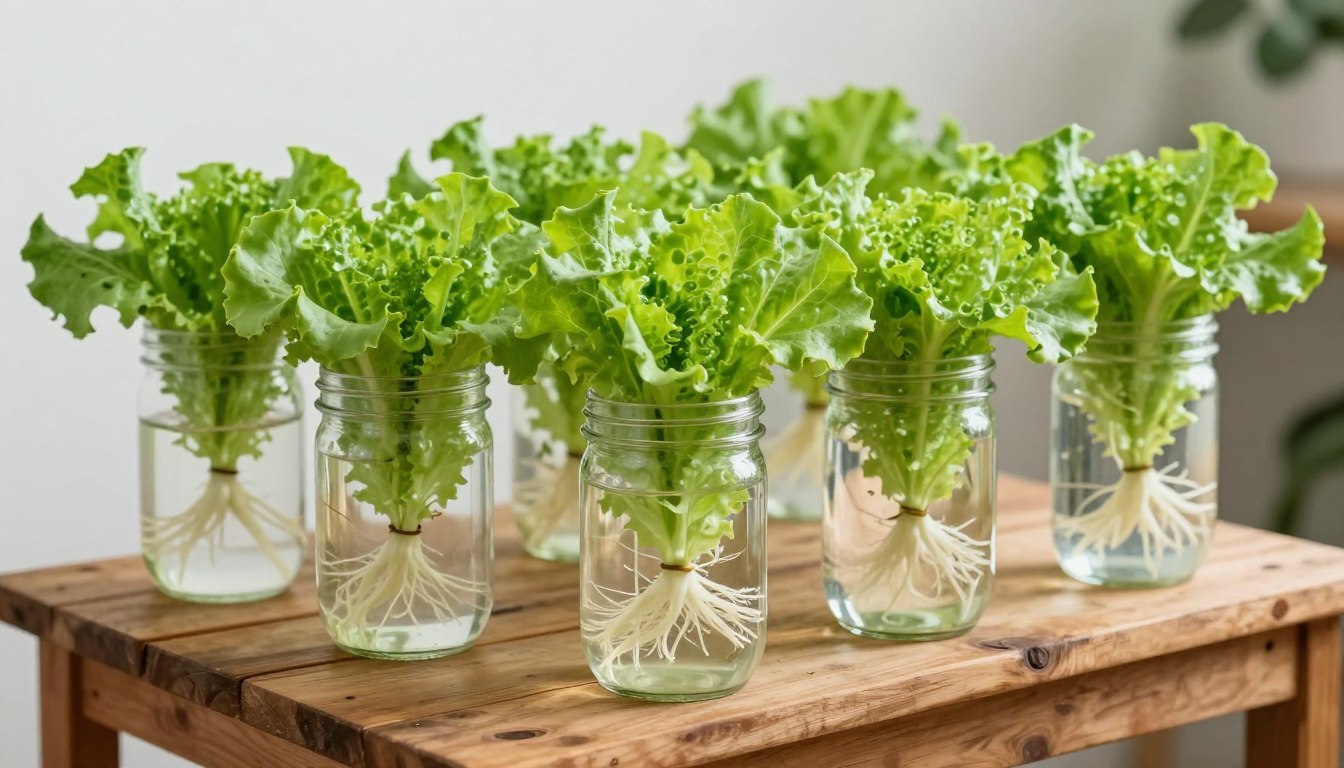
Glass mason jars look attractive and let you observe root development. However, roots exposed to light can suffer and algae grows easily. Wrap jars in aluminum foil or black paper leaving only the top exposed. This combines visibility with light protection.
Avoid metal containers as nutrients can react with metal surfaces. Ceramic containers work but are heavy and expensive. Stick with opaque plastic for best results unless you specifically want the visual appeal of glass with proper light blocking.

Step-by-Step Guide to Setting Up Your Kratky System
Building your first Kratky system takes less than an hour. Follow these steps carefully for the best results. Proper setup prevents problems later and gives plants the best environment for growth.

Step 1: Prepare Your Container and Lid
Start with a clean, food-grade container. Wash it thoroughly with soap and water. Rinse completely to remove any soap residue. Dry the container fully before proceeding.
Measure the diameter of your net pot. Mark this size on the container lid. Use a hole saw attachment on your drill to cut the opening. The hole should be slightly smaller than the net pot rim so the pot sits securely without falling through.
Sand any rough edges on the cut hole. This prevents damage to plants and makes insertion easier. Test fit your net pot. It should sit firmly with the rim resting on the lid surface. If the hole is too large, use a smaller net pot or create a collar from waterproof tape.

Step 2: Prepare and Test Your Source Water
Water quality affects plant health significantly. Test your tap water pH and EC levels before adding nutrients. Most tap water works fine but knowing baseline values helps later troubleshooting.
Fill your container with water leaving about two inches of space at the top. This prevents overflow and allows room for the initial water level positioning. Let tap water sit for 24 hours if it contains chlorine. This allows chlorine to evaporate naturally.
If your water has very high EC (above 300 ppm), consider using filtered water. Hard water with high mineral content can interfere with nutrient ratios. Reverse osmosis water works great but requires more calcium and magnesium supplementation.
Pro Tip: Keep a gallon of adjusted water ready for topping off containers. This saves time and ensures consistency when plants need more solution during growth.
Step 3: Mix Your Nutrient Solution
Follow the nutrient manufacturer’s instructions exactly. Different brands have different concentration rates. Most recommend mixing nutrients in a separate container first before adding to your main reservoir.
For three-part nutrients, add bottles in the correct order. Typically you add Part A first, stir thoroughly, then Part B, stir again, then Part C if included. Never mix concentrated nutrients directly together as they can react and precipitate.
Start with slightly weaker concentrations than recommended for seedlings and young plants. Half strength works well for the first two weeks. This prevents nutrient burn while roots establish. Increase to full strength as plants mature.

Step 4: Adjust pH Levels
After adding nutrients, test the solution pH. The ideal range for most plants in the Kratky Method sits between 5.5 and 6.5. Leafy greens prefer the lower end around 5.8 to 6.2. Herbs tolerate a slightly wider range.
If pH is too high, add pH down solution drop by drop. Stir thoroughly and wait a few minutes before retesting. If pH is too low, use pH up solution the same way. Make small adjustments as pH solutions are concentrated and work quickly.
Check EC or TDS levels to confirm nutrient concentration. For leafy greens, aim for 1.2 to 1.8 EC or 800 to 1200 ppm. Write these numbers down for future reference. They help track changes over time and troubleshoot problems.
Important: pH will drift slightly over time as plants consume nutrients. This is normal. The Kratky Method works best when initial pH is properly set, eliminating the need for frequent adjustments.
Step 5: Prepare Your Seedling
Start seeds in rockwool cubes, rapid rooter plugs, or similar starting media. Seeds need to germinate and develop a small root system before transferring to the Kratky system. This typically takes one to two weeks depending on the plant variety.
Look for roots emerging from the bottom of the starting cube. The seedling should have its first true leaves developed. This indicates the plant is ready for the nutrient solution and can handle the transition.
If using hydroton clay pebbles, rinse them thoroughly first. Dust from new hydroton can cloud your nutrient solution and affect pH. Soak them in pH-adjusted water for an hour before use. This also prevents them from floating initially.

Step 6: Assemble and Place Your Plant
Insert the net pot into the lid hole. Place a small amount of hydroton in the bottom of the net pot. Set your seedling with its starting cube inside the net pot. Fill around the seedling with more hydroton until the cube is covered and the plant sits stable.
The hydroton should come up to just below the first leaves. This provides support while allowing leaves to remain dry and free. Pack the medium gently but not too tightly. Roots need to penetrate through easily.
Position the assembled lid with net pot onto your filled container. Ensure the bottom of the net pot and roots touch the nutrient solution surface. This initial contact is crucial. The growing medium should wick up moisture to keep the seedling hydrated until roots extend down.

Step 7: Position Your System
Place your completed Kratky system in its growing location. Leafy greens need 12 to 16 hours of light daily. A sunny windowsill works for small setups. Larger systems benefit from supplemental grow lights for consistent results.
Avoid locations with extreme temperature fluctuations. Basements stay cool but may lack light. Garages can get too hot in summer. Indoor spaces with stable temperatures between 65-75°F produce the best growth for most crops.
Ensure the container sits level. Uneven surfaces cause inconsistent water levels across the root zone. Use shims or adjust shelving as needed. Check that the setup is stable and won’t tip over as plants grow top-heavy.
Step 8: Monitor Initial Growth
Check your system daily for the first week. Look for signs of transplant shock like wilting leaves. Some droop is normal for a day or two. Plants should perk up quickly as roots adapt to their new environment.
Watch for roots extending from the net pot into the solution. This usually happens within three to five days. Once roots reach the solution, the plant should show vigorous growth. New leaves appear and color deepens as the plant establishes.
Note the initial water level by marking the outside of the container. This helps track consumption rates and plan for future grows. As the plant matures, water level should drop steadily creating the essential air gap for root respiration.
Watch Out: If leaves turn yellow or show brown spots within the first week, check pH and nutrient strength immediately. Early problems are easier to fix than issues discovered later.

Best Plants for the Kratky Method
Not all plants suit the Kratky Method equally. Fast-growing leafy greens and herbs perform exceptionally well. Slower growing plants or those with high nutrient demands present challenges in this passive system. Choosing appropriate varieties ensures success, especially for beginners.

Lettuce Varieties
Lettuce stands as the gold standard for Kratky growing. Most varieties mature in 30 to 45 days, matching perfectly with the nutrient depletion timeline. The shallow root system fits well in smaller containers. Lettuce tolerates the passive nature of this method better than almost any other crop.
Leaf lettuce varieties like red leaf, green leaf, and oak leaf work wonderfully. They grow quickly and don’t form tight heads that can trap moisture. Butterhead types like Bibb and Boston also thrive. Their loose, tender leaves make excellent salads.
Romaine lettuce takes slightly longer but grows successfully in Kratky systems. Use slightly larger containers and be prepared for a 45 to 55 day growing period. Crisphead varieties like iceberg are possible but more challenging due to their dense structure and longer maturation time.

Best Lettuce Varieties for Kratky
- Red Leaf Lettuce – Fast growing, beautiful color
- Green Leaf Lettuce – Reliable producer
- Buttercrunch – Sweet, tender leaves
- Oak Leaf – Unique shape, mild flavor
- Tom Thumb – Compact, perfect for small containers
- Little Gem – Baby romaine, excellent flavor
Growing Time and Container Size
- Harvest time: 30-45 days from transplant
- Container size: Quart to half-gallon
- Spacing: One plant per quart container
- Light needs: 12-14 hours daily
- Temperature: 60-70°F optimal
- pH range: 5.8-6.2 ideal
Herbs That Thrive
Many culinary herbs adapt beautifully to the Kratky Method. Basil tops the list as one of the fastest growing and most productive herbs. A single basil plant in a quart jar provides regular harvests for weeks. The key is harvesting correctly to encourage bushier growth.
Cilantro grows quickly but bolts easily in warm conditions. Start new plants every few weeks for continuous supply. Parsley takes longer to germinate but grows steadily once established. Mint varieties work well but can be aggressive, making container growing ideal.
Oregano, thyme, and other Mediterranean herbs need more attention to water levels. They prefer slightly drier conditions than lettuce. Watch the air gap carefully and don’t rush to refill the reservoir. These herbs appreciate good air circulation around roots.

Leafy Greens and Asian Vegetables
Spinach grows well in cooler conditions, making it perfect for spring or fall Kratky growing. Baby spinach varieties mature quickly in just three to four weeks. The tender leaves make excellent salads before the plant bolts in warm weather.
Swiss chard tolerates wider temperature ranges than lettuce and provides colorful stems. Both rainbow chard and traditional varieties work well. Kale grows successfully though it needs larger containers and longer growing time. Choose dwarf varieties for better results.
Asian greens like bok choy, mizuna, and tatsoi excel in Kratky systems. They grow rapidly and tolerate cooler temperatures. Bok choy baby varieties reach harvest size in 30 days. These vegetables add diversity to salads and stir-fries.
Excellent Choices
- All lettuce varieties
- Basil and cilantro
- Spinach and arugula
- Bok choy and pak choi
- Swiss chard
Moderate Difficulty
- Cherry tomatoes (dwarf varieties)
- Strawberries (alpine types)
- Small peppers
- Cucumbers (bush varieties)
- Kale and collards
Not Recommended
- Large tomato varieties
- Full-size peppers
- Eggplants
- Melons and squash
- Root vegetables
Growing Tomatoes with Kratky Method
Tomatoes can grow in Kratky systems but require special consideration. Choose determinate dwarf varieties bred for containers. Full-size indeterminate tomatoes need too much water and nutrients for passive systems to handle effectively.
Use five-gallon containers minimum for tomatoes. Even dwarf varieties develop extensive root systems. Expect to refill the nutrient solution at least once during the growing cycle. Cherry and grape tomatoes work better than large slicing varieties.
Provide strong support as plants grow and fruit develops. The weight of tomatoes can tip containers if not properly secured. Some growers report excellent results while others struggle. Success depends largely on variety selection and growing conditions.

Get Seeds Perfect for Kratky Growing
Start your Kratky garden with varieties proven to thrive in passive hydroponic systems. These seed collections include the best-performing lettuce, herbs, and greens for beginners and experienced growers alike.
Understanding Nutrient Solution Management
The nutrient solution provides everything plants need except light and air. Getting the mixture right makes the difference between thriving plants and struggling crops. Unlike recirculating hydroponic systems, the Kratky Method requires accurate initial preparation since adjustments are difficult later.

Choosing the Right Nutrients
Hydroponic nutrients differ significantly from soil fertilizers. Standard garden fertilizers lack micronutrients that soil naturally provides. Plants growing in water need every element supplied through the solution. Always use nutrients specifically formulated for hydroponics.
Three-part nutrient systems offer the most flexibility. You can adjust ratios for different growth stages and plant types. However, for the simplicity of the Kratky Method, two-part or all-in-one formulas work perfectly well for leafy greens and herbs.
Popular brands include General Hydroponics Flora series, Masterblend, and Dyna-Gro. Each has slightly different formulations and concentration levels. Read instructions carefully as mixing ratios vary. Some nutrients are more concentrated requiring less solution per gallon.
Calculating Nutrient Amounts
Start by knowing your container volume. A five-gallon bucket holds five gallons of water obviously, but remember to account for displacement from the net pot and roots. A quart mason jar holds slightly less than one quart of actual solution.
Most nutrient instructions specify amounts per gallon. For smaller containers, scale down proportionally. Use a calculator or conversion chart. Measuring accurately matters more in smaller volumes where errors are magnified.
For leafy greens, mix nutrients at three-quarters to full strength. Herbs often prefer slightly weaker solutions. Fruiting plants like tomatoes need full-strength nutrients throughout their longer growing period. When in doubt, start weaker and watch plant response.
| Plant Type | EC Range | TDS (ppm) | pH Range | Growth Period |
| Lettuce | 1.2 – 1.8 | 800 – 1200 | 5.8 – 6.2 | 30-45 days |
| Herbs (Basil, Cilantro) | 1.0 – 1.6 | 700 – 1100 | 5.5 – 6.5 | 25-40 days |
| Spinach | 1.5 – 2.0 | 1000 – 1400 | 6.0 – 6.5 | 30-50 days |
| Swiss Chard | 1.4 – 1.8 | 900 – 1200 | 6.0 – 6.5 | 40-60 days |
| Tomatoes (Dwarf) | 2.0 – 3.5 | 1400 – 2500 | 5.8 – 6.3 | 70-90 days |
| Bok Choy | 1.2 – 1.8 | 800 – 1200 | 6.0 – 7.0 | 30-45 days |
The Critical Importance of pH
pH measures how acidic or alkaline your solution is. This number dramatically affects nutrient availability. Even with perfect nutrient concentration, plants can’t absorb elements if pH sits outside the optimal range. Most nutrients lock out at extreme pH levels.
For the Kratky Method, target pH between 5.5 and 6.5 depending on your crop. Leafy greens prefer 5.8 to 6.2. Herbs tolerate 5.5 to 6.5. Tomatoes and fruiting crops do best at 5.8 to 6.3. Staying within these ranges ensures maximum nutrient uptake.
Test pH after mixing all nutrients but before adding plants. pH naturally drifts as plants consume nutrients. In the Kratky Method, this drift is acceptable within reason. The goal is setting correct initial pH so natural drift stays within the acceptable range throughout the grow cycle.

When and How to Adjust pH
Use pH down to lower pH if it tests too high. Phosphoric acid is the most common pH down solution. Add drops slowly while stirring. Wait two minutes then retest. pH solutions are concentrated and work quickly. Overshooting means adding pH up to correct, creating a frustrating cycle.
pH up raises low pH. Potassium hydroxide or potassium carbonate are typical ingredients. Apply the same careful approach. Small amounts make big changes. Keep a log of how much adjustment your water typically needs. This helps speed up future preparations.
Some growers report using citric acid for pH down and baking soda for pH up. While these food-grade options work, they’re less stable and precise than commercial products. For consistent results, invest in proper pH adjustment solutions designed for hydroponics.
Pro Tip: Mix nutrients in the same order every time and wait 10 minutes before testing pH. This allows the solution to stabilize and gives you the most accurate reading.
Managing Water Quality Issues
Tap water varies dramatically by location. Some municipal water is nearly perfect for hydroponics. Other sources contain high minerals, chlorine, or chloramine. Understanding your water helps prevent mysterious plant problems.
Hard water contains high calcium and magnesium. While plants need these elements, excess amounts interfere with other nutrients. If your EC meter shows readings above 300 ppm before adding any nutrients, consider filtered or reverse osmosis water.
Chlorine in water evaporates if left standing for 24 hours. Chloramine does not. If your water contains chloramine, use a filter or add a dechlorinator product. Some hydroponic nutrients contain compounds that neutralize chloramine, but check your specific brand.
Get Professional-Grade Testing Equipment
Accurate pH and EC measurement is essential for Kratky success. These reliable meters help you dial in perfect nutrient solutions every time. Invest in quality tools that last and provide consistent readings.
Maintenance and Monitoring Your Kratky System
The Kratky Method earns its reputation as low-maintenance, but it’s not zero-maintenance. Regular quick checks ensure problems are caught early. Most issues are simple to prevent but harder to fix once plants show symptoms. A few minutes of attention each week keeps your system running smoothly.

Daily Observation Routine
Check plants visually each day. Look for changes in leaf color, wilting, or unusual spots. Healthy plants show steady growth with vibrant green coloring. New leaves should emerge regularly once the plant establishes in the system.
Observe water level through container sides if possible. Mark the outside of opaque containers to track water consumption. Fast water loss might indicate high temperatures causing excessive evaporation. Very slow consumption suggests root or nutrient problems.
Watch for pests on leaf surfaces and under leaves. Kratky systems aren’t immune to aphids, spider mites, or whiteflies. Catching infestations early makes control much easier. Indoor systems generally have fewer pest issues than outdoor setups.
Weekly Maintenance Tasks
Once weekly, check the air gap between the water surface and net pot bottom. This gap should gradually increase as plants grow and consume solution. For lettuce, expect to see noticeable changes each week. Slower-growing plants show more gradual progression.
Wipe down container exteriors and lids. Dust and debris can harbor pests or mold. Clean growing areas promote healthier plants. Check that net pots remain firmly seated and haven’t shifted. Top-heavy plants sometimes pull pots askew as they grow.
Inspect roots if your container allows visibility. Healthy roots appear white to light tan. Brown, slimy roots indicate problems like root rot from warm temperatures or initial overwatering. The distinctive rotten smell confirms root issues before visual symptoms appear in leaves.
- Examine leaf health and color for changes or problems
- Check water level and mark consumption rate
- Inspect for pests on all leaf surfaces
- Verify air gap is increasing appropriately
- Clean container exteriors and remove debris
- Check root color if container permits viewing
- Confirm proper lighting duration and intensity
- Monitor ambient temperature around growing area

When to Refill vs When to Harvest
For fast-growing leafy greens, the goal is timing harvest with nutrient depletion. Lettuce typically matures as the reservoir empties. This eliminates the need for refilling during the growth cycle. The plant reaches peak harvest size right when it runs out of food.
Longer-term crops like tomatoes or herbs need refilling. Wait until the water level drops to about two inches remaining. Prepare fresh nutrient solution at the same strength as initially. Carefully pour down the inside of the container avoiding disturbance to roots.
Don’t top off with plain water. This dilutes remaining nutrients creating imbalances. Always use properly mixed nutrient solution. Some growers prepare a slightly stronger concentration for refills to compensate for nutrients remaining in the bottom inches.
Temperature Management
Water temperature affects oxygen levels and plant health. Warm water holds less dissolved oxygen than cool water. Aim to keep your nutrient solution between 65-72°F. Higher temperatures encourage root rot and algae growth. Lower temperatures slow plant growth.
Indoor systems usually maintain stable temperatures. Outdoor setups face greater challenges. In summer, shade containers from direct sun. Dark-colored buckets absorb heat, warming the solution inside. White containers or wrapping dark ones with white fabric helps reflect heat.
In winter, moving systems indoors or into greenhouses maintains better temperatures. Cold water below 60°F significantly slows growth. Extremely cold temperatures can damage or kill plants. Use water heaters for aquariums if needed in very cold conditions, though this adds complexity and cost.
Temperature Alert: If nutrient solution temperature exceeds 75°F, root problems become likely. Consider relocating containers to cooler spots or adding insulation to buffer temperature swings.

Dealing with Algae Growth
Algae thrives when light reaches nutrient solution. While not directly harmful to plants, algae competes for nutrients and oxygen. Heavy algae growth can cause pH swings and unpleasant odors. Prevention is far easier than removal.
Use opaque containers or cover clear ones completely. Light-blocking sleeves fit over mason jars preventing algae while allowing you to monitor root development. Black plastic or aluminum foil wrapped around containers works effectively.
If algae appears, remove what you can during system cleaning. Improve light blocking for future grows. Some growers add beneficial bacteria products that outcompete algae. Hydrogen peroxide can kill algae but also harms beneficial microbes, so use cautiously.
Recognizing Nutrient Deficiency Symptoms
Yellowing older leaves might indicate nitrogen deficiency. Purple or reddish leaf undersides suggest phosphorus shortage. Brown leaf edges often mean potassium deficiency. Pale new growth can signal iron or manganese deficiency.
With the Kratky Method, addressing deficiencies mid-grow is challenging. Trying to add nutrients to a running system risks upsetting the pH and overall balance. Prevention through proper initial setup is crucial. For future grows, adjust your nutrient concentration based on what you observed.
If deficiency symptoms appear early in the grow cycle, consider starting fresh with properly mixed solution. Attempting to limp along usually results in disappointing harvests. Learn from the experience and dial in your nutrients better for the next round.

Common Problems and Solutions
Even simple systems encounter occasional issues. Recognizing problems early and knowing how to respond prevents total crop failure. Most Kratky Method problems trace back to a handful of common causes that are straightforward to address.

Wilting or Drooping Plants
Plants that wilt despite having water available signal problems. First check if roots can actually reach the nutrient solution. The gap might have grown too large if water level dropped unexpectedly. Verify that the growing medium stays slightly moist through capillary action.
Excessive heat causes wilting even with adequate water. High temperatures stress plants and increase water loss through leaves faster than roots can replace it. Move containers to cooler locations or improve ventilation around plants.
Root rot from too-warm water or bacterial infection also causes wilting. Check for foul smells and brown slimy roots. Unfortunately, root rot is difficult to reverse in Kratky systems. Prevention through proper temperature control is essential.
Slow or Stunted Growth
Plants that stop growing or grow very slowly despite appearing healthy need investigation. Low light is the most common culprit. Leafy greens need 12-16 hours of good light daily. Inadequate lighting creates tall, leggy plants with few leaves and weak stems.
Check your nutrient strength with an EC meter. Too weak and plants can’t get enough nutrition. Too strong and osmotic stress inhibits growth. Verify pH hasn’t drifted outside the acceptable range. Even slightly off pH locks out essential nutrients.
Cold temperatures slow growth dramatically. Most crops need air temperatures above 60°F for good growth. Water temperatures below 60°F also inhibit nutrient uptake. Raising temperature often jumpstarts stagnant plants back into active growth.
Why are my plant’s leaves turning yellow?
Yellowing leaves usually indicate nitrogen deficiency or pH problems preventing nutrient uptake. Check pH first and adjust if needed. If pH is correct, your nutrient solution may be too weak or depleted. For future grows, use stronger initial nutrient concentration.
Can I reuse nutrient solution from a completed grow?
Not recommended. The solution has been depleted of nutrients and the balance is unknown. Always mix fresh solution for each growing cycle. Old solution can harbor bacteria or pathogens that affect new plants.
What if my plant grows too big for the container?
Harvest the plant before it becomes root-bound. Planning container size appropriately for each crop prevents this issue. If caught early, you can carefully transfer to a larger container, though this disrupts the passive nature of the Kratky Method.
Is it normal for water level to drop unevenly?
Yes, especially if containers aren’t perfectly level. The critical factor is maintaining root contact with solution. Mark water levels to track consumption patterns. Adjust for uneven containers when setting initial water level.
Pests and Disease Management
Aphids and whiteflies occasionally find their way to indoor Kratky gardens. Inspect leaf undersides weekly. Catching small populations early allows hand removal or spraying with insecticidal soap. Outdoor systems face more pest pressure from the surrounding environment.
Fungus gnats are attracted to damp growing medium. While mostly annoying rather than destructive, large populations can damage roots. Allow the top layer of growing medium to dry slightly between waterings. Yellow sticky traps catch adult gnats reducing reproduction.
Powdery mildew appears as white powdery patches on leaves. It thrives in humid conditions with poor air circulation. Improve airflow around plants. Remove affected leaves. Neem oil spray provides organic control. Prevention through proper spacing and ventilation works best.

Root Problems
Healthy roots are white to light tan and firm. Brown, mushy roots with foul odor indicate root rot. This bacterial infection occurs when roots sit in warm, oxygen-poor water. While rare in properly managed Kratky systems, it can happen in hot weather.
Prevention involves keeping nutrient temperature below 75°F and ensuring adequate air gap development. Once root rot establishes, recovery is unlikely. Remove affected plants to prevent spread. Clean and sterilize containers before reusing.
Some brown staining on roots is normal over time. The difference between staining and rot is texture and smell. Stained roots remain firm and have no odor. Rotted roots feel slimy and smell distinctly foul.
pH and Nutrient Issues
pH drift outside acceptable ranges locks out nutrients even when present in the solution. Retest pH if plants show deficiency symptoms. In established systems, adjusting pH is risky as it can shock plants. Better to accept some drift within reason and learn for next time.
Nutrient lockout occurs when elements bind together becoming unavailable to plants. This often results from improper mixing order or using incompatible products together. Always follow manufacturer instructions exactly and mix nutrients in the specified sequence.
If you suspect serious nutrient or pH problems early in growth, starting over with fresh, properly prepared solution may be the best option. Mid-cycle corrections are difficult in passive systems and often cause more problems than they solve.
Prevention Tip: Keeping detailed records of each grow including nutrient brands, amounts used, pH values, and plant performance helps troubleshoot problems and refine your technique over time.
Harvesting and Maximizing Your Yield
Harvesting at the right time and using proper techniques extends productivity. The method differs depending on whether you’re growing cut-and-come-again crops or single-harvest plants. Understanding these differences maximizes what you get from each system.

When to Harvest Lettuce and Greens
Leaf lettuce can be harvested as baby greens in just three weeks or left to mature fully. Baby greens offer tender, mild flavor perfect for salads. Mature heads provide more volume and fuller flavor. Watch for signs that the plant is approaching maturity before it bolts.
Bolting occurs when lettuce sends up a flower stalk. Leaves become bitter once this happens. Hot weather triggers early bolting. Harvest before temperatures consistently exceed 75°F. Look for center leaves starting to elongate as an early warning sign.
For head lettuce varieties, wait until heads feel firm when gently squeezed. Loose leaf types don’t form heads but should have abundant foliage. Harvest entire plants by cutting at the base above the roots. This allows easy container cleanup for the next planting.
Harvesting Herbs for Continuous Production
Basil and other herbs benefit from regular harvesting. Pinch or cut stem tips just above a leaf node. This encourages branching creating bushier plants with more harvestable growth. Never remove more than one-third of the plant at once.
Harvest herbs in the morning after dew dries but before heat of day. This is when essential oils are most concentrated. Use sharp scissors or pruning shears for clean cuts. Ragged tears can introduce disease.
Let herbs regrow between harvests. Most need one to two weeks to produce new growth after significant harvesting. With proper technique, a single basil plant can produce for several months before declining productivity signals time to start fresh.

Signs of Harvest Readiness
Each crop shows specific indicators of maturity. Lettuce develops full leaf size and firmness. Spinach reaches 4-6 inches in height with multiple true leaves. Herbs become bushy with strong aroma when leaves are rubbed.
Check seed packet information for days to maturity. This gives a rough timeline though actual timing varies with conditions. Hydroponic growing often runs faster than soil-based timelines. Track your actual harvest dates to refine expectations.
When in doubt, taste test. Sample a leaf to check flavor and texture. Plants harvested slightly early are usually tender and mild. Overripe plants can be tough or bitter. Finding your preferred harvest stage comes with experience.
Cleaning Up After Harvest
Remove spent plants and roots from containers. Roots that grew into the solution may have filled significant space. Dispose of root mass in compost. Clean roots shouldn’t smell bad and are excellent compost material.
Rinse containers thoroughly with water. For sanitizing between grows, use diluted bleach solution (1 tablespoon per gallon of water). Rinse thoroughly afterward to remove all bleach residue. This prevents disease carryover to new plantings.
Clean net pots and growing medium. Hydroton can be reused after rinsing and sterilizing. Some growers bake hydroton at 200°F for 20 minutes to sterilize. Rockwool and other one-use media should be discarded and fresh material used for new plants.
Maximum Lettuce Production
- Plant new seedlings every 2 weeks
- Stagger varieties for continuous harvests
- Use baby green strategy for faster turnover
- Harvest outer leaves while plant continues growing
- Aim for 6-8 complete harvests per year per container
Herb Garden Rotation
- Start new plants while established ones produce
- Regular harvesting extends plant productivity
- Replace plants showing decline in vigor
- Grow multiple containers of favorites
- Expect 2-4 months production from single herb plant

Scaling Up Your Kratky Garden
Success with your first few containers naturally leads to wanting more production. The Kratky Method scales well for home use and small-scale commercial operations. Smart planning prevents your expanded setup from becoming overwhelming to manage.

Building a Multi-Container System
Start by assessing your space. Vertical shelving maximizes production in small areas. Standard wire shelving works perfectly for supporting containers. Ensure shelves can handle the weight of containers full of water. Each five-gallon bucket with solution and plant weighs over 40 pounds.
Group containers by crop type and harvest schedule. This simplifies management when all containers of one type need attention at once. It also helps with lighting, as different crops have varying light requirements. Keep lettuce separate from longer-term herbs or tomatoes.
Consider plumbing multiple containers together for easier nutrient preparation. Some growers use large reservoir tanks with multiple tubes feeding individual containers. This maintains the Kratky passive approach while simplifying nutrient management. However, it increases complexity and isn’t necessary for most home setups.
Lighting for Larger Setups
Natural light works for windowsill gardens but limits scale. LED grow lights enable year-round production anywhere in your home. Modern LEDs are affordable, energy-efficient, and provide full-spectrum light plants need.
Calculate lighting needs based on coverage area. Most LED grow lights specify coverage dimensions. Position lights 12-24 inches above plants depending on intensity. Too close causes light burn. Too far and plants stretch toward light becoming leggy.
Use timers to automate light schedules. Leafy greens need 12-16 hours daily. Herbs often do well with 14-16 hours. Consistent lighting produces more uniform growth. Timers also save energy and prevent accidentally leaving lights on.

Succession Planting Strategy
Succession planting means starting new plants at regular intervals. This provides continuous harvests rather than feast-or-famine production. For lettuce, starting four to six containers every two weeks ensures ready-to-harvest greens available all the time.
Label containers with planting dates and variety names. This helps track progress and refine timing. You’ll learn how long each variety takes in your specific conditions. Recording this information prevents guesswork in future planning.
Mix fast and slow-growing crops for variety. Lettuce provides quick rewards while herbs and tomatoes offer long-term production. This balance keeps your system productive and interesting throughout the year.
Efficient Workspace Organization
Designate specific areas for different tasks. Keep nutrient mixing supplies together in one location. Have a harvest and cleaning station separate from growing areas. This workflow prevents cross-contamination and makes maintenance tasks faster.
Store nutrients properly according to package directions. Keep pH meters clean and calibrated. Having tools organized and ready to use makes routine maintenance less of a chore. Good organization is the difference between sustainable production and a system that becomes overwhelming.
Create a simple tracking system for monitoring. A whiteboard or notebook with basic information prevents forgetting important dates or tasks. Record planting dates, varieties, and any issues encountered. This documentation helps troubleshoot problems and improves your technique over time.
Scaling Tip: Double or triple your production gradually rather than all at once. This allows you to refine techniques and identify any challenges before investing heavily in a large setup.
![]()
Expert Tips for Kratky Method Success
These practical insights come from experienced Kratky growers who’ve refined their techniques through trial and error. Implementing these tips helps avoid common pitfalls and improves your results from the very first grow.

Start with Quality Seeds and Transplants
Your plants can only be as good as their starting point. Purchase seeds from reputable suppliers. Old or improperly stored seeds have low germination rates. Fresh seeds from trusted sources give your Kratky system the best chance for success.
If buying transplants, inspect them carefully. Avoid plants showing yellow leaves, insects, or signs of disease. These problems transfer directly into your system. Starting with healthy plants is worth any extra cost or effort.

Master One Crop Before Diversifying
Begin your Kratky journey with lettuce. It grows quickly, tolerates mistakes, and produces reliable results. Once you successfully grow lettuce through several cycles, branch out to herbs. After mastering leafy greens and herbs, attempt more challenging crops like tomatoes.
This progressive approach builds skills and confidence. Each crop teaches lessons about nutrient management, pH control, and timing. Trying too many different plants initially creates confusion about what works and what doesn’t.
Keep Detailed Records
A simple notebook transforms your growing from guesswork to a refined system. Record the date planted, variety, container size, initial pH, EC level, and any adjustments made. Note when you see the first new growth, when you harvest, and final yield.
Review these records before starting new plants. You’ll notice patterns and can replicate successful grows while avoiding past mistakes. Over time, this data becomes incredibly valuable for optimizing your technique and planning production schedules.

Maintain Cleanliness
Clean tools and containers prevent disease spread between grows. Sanitize everything that contacts nutrient solution. Algae, bacteria, and mold thrive in dirty systems, causing persistent problems that compromise plant health and reduce yields.

Perfect Your Container Seals
Gaps around net pots allow light in promoting algae growth. They also provide entry points for pests. Use foam collars or rubber grommets to seal openings completely. This small attention to detail prevents multiple problems down the road.

Experiment with Varieties
Different lettuce varieties have unique flavors, colors, and growth characteristics. Try several types to discover favorites. Specialty varieties unavailable in stores make home growing especially rewarding. Experimentation keeps the hobby interesting and expands your palate.
Understanding Air Gap Development
The air gap is what makes the Kratky Method work. As water depletes, roots in the air space absorb oxygen. Roots submerged in solution take up water and nutrients. This natural division of labor sustains plant health without mechanical aeration.
Don’t panic if roots don’t immediately reach the water. Capillary action through the growing medium keeps young plants hydrated. Within a few days, roots will extend down. By one week, you should see visible roots entering the solution.
For longer-term crops, monitor air gap size. It should continue expanding as the plant grows. If water level drops too quickly early on, the air gap becomes too large before the root system develops adequately. This indicates container size may be too small for the crop.

Temperature Optimization
Plants grow fastest within their preferred temperature range. For most leafy greens and herbs, this means 65-75°F for air temperature and 60-70°F for water temperature. Maintaining these ranges produces noticeably faster growth and better quality.
Use a simple thermometer to monitor growing area temperature. Track daily highs and lows. If temperature swings exceed 20°F in a 24-hour period, plants stress. Moderate swings through better location choice or environmental control.
Water temperature is harder to control than air temperature. Insulating containers or placing them on insulated surfaces helps buffer temperature changes. In summer, containers on concrete floors stay cooler. In winter, elevating off cold surfaces prevents chilling.
Lighting Optimization
Light intensity and duration dramatically affect growth rate and quality. Insufficient light creates pale, leggy plants with poor flavor. Excessive light can cause leaf burn and stress. Finding the sweet spot for each crop improves results significantly.
For natural light, south-facing windows in the northern hemisphere provide the brightest conditions. East or west windows work but provide less total light. Rotate containers occasionally so all sides receive equal light exposure preventing lopsided growth.
With grow lights, measure the actual light reaching plants with a light meter or phone app. Many lights don’t provide their advertised intensity, especially cheaper models. Position lights close enough for good intensity but far enough to prevent heat damage.
“The Kratky Method taught me that growing food doesn’t require complexity. Simple systems consistently maintained produce amazing results. Start small, learn the basics, and let your garden grow with your knowledge.”
Frequently Asked Questions About Kratky Method

Can I use regular garden fertilizer for the Kratky Method?
No, regular garden fertilizer lacks the complete nutrient profile needed for hydroponic growing. Soil provides many nutrients that must be supplied through solution in soilless systems. Always use fertilizers specifically formulated for hydroponics. These contain all essential macro and micronutrients in appropriate forms and ratios.
How long does a typical Kratky grow cycle take?
For lettuce and most leafy greens, expect 30-45 days from transplanting seedlings to harvest. Herbs like basil take 25-40 days for first harvest, then continue producing. Tomatoes and fruiting crops need 70-90 days or more. Fast-growing crops matching the natural nutrient depletion timeline work best for true passive Kratky systems.
Do I need special lights or can I use natural sunlight?
Natural sunlight works perfectly for Kratky growing if you have a bright sunny window or outdoor space. However, grow lights provide control over photoperiod and enable growing anywhere in your home year-round. LED grow lights are affordable and energy-efficient, making them a good investment for serious growers.
What happens if I accidentally overfill the container?
Overfilling eliminates the air gap that roots need for oxygen. Plants may show wilting or yellowing leaves within days. If caught immediately, carefully siphon out excess solution until proper level is restored. In severe cases where roots were submerged for extended periods, root damage may have occurred. Monitor closely and be prepared to start fresh if the plant doesn’t recover.
Can I grow the Kratky Method organically?
Yes, organic hydroponic nutrients are available from several manufacturers. However, organic nutrients can be trickier to work with in passive systems as they may contain particles that settle or create odors. They also tend to alter pH more than synthetic nutrients. Many growers find success with organic nutrients by using quality products and monitoring systems more carefully.
Is it okay to check roots by lifting the lid occasionally?
Brief inspections won’t harm plants, but frequent disturbance stresses them. Check roots when initially setting up to confirm water contact, then leave undisturbed for at least a week. If using clear containers, you can observe without disturbing. Excessive handling increases contamination risk and disrupts the passive nature of the system.
What’s the best way to learn the Kratky Method?
Start with a single lettuce plant in a mason jar. This minimal investment teaches all the basics with quick results. Once you successfully grow and harvest that first plant, expand gradually. Read extensively, watch video tutorials, join online communities, and keep records of your experiences. Hands-on experience combined with learning from others’ successes and failures accelerates your skill development.
Can Kratky systems work outdoors in all climates?
Kratky works outdoors in mild climates during appropriate seasons. Extreme heat, cold, or heavy rainfall present challenges. Containers need protection from direct sun to prevent overheating. Cover from rain prevents dilution of nutrients. In harsh climates, indoor or protected greenhouse growing provides better control. Outdoor Kratky works well in spring and fall in temperate regions.
Why do some people say Kratky doesn’t work for certain plants?
The Kratky Method excels with fast-growing, short-cycle crops. Long-term plants or those with high nutrient demands often outgrow what a single static reservoir provides. Fruiting plants need nutrient replenishment and more intensive management. While technically possible to grow these crops with Kratky, other hydroponic methods often prove more practical for them.
How do I know if my local water is suitable for Kratky Method?
Test your tap water’s pH and EC before adding nutrients. Ideal starting water has pH between 6.0-8.0 and EC below 300 ppm (0.3 EC). Water outside these ranges can work but requires more adjustment. Contact your water utility for a water quality report showing mineral content and treatments used. This information helps predict how your water will behave in hydroponic systems.
Ready to Master the Kratky Method?
Take your hydroponic growing to the next level with our comprehensive Kratky Method course. Learn advanced techniques for maximizing yields, troubleshooting problems, and scaling production. Perfect for home gardeners ready to move beyond the basics.

Start Growing with the Kratky Method Today
The Kratky Method removes barriers that prevent people from growing their own food. No expensive equipment, no complicated systems, no constant monitoring. Just plants, water, nutrients, and patience. This simplicity makes fresh, homegrown produce accessible to anyone with a sunny window or shelf space.
Your first harvest will taste sweeter knowing you grew it yourself using this elegant passive system. The confidence gained from that initial success builds quickly. Soon you’ll be expanding your setup, trying new varieties, and sharing your abundance with others.
Start small with a single lettuce plant or herb. Learn the basics hands-on. Make mistakes on a small scale where they don’t matter much. As your skills grow, so will your garden. The Kratky Method scales beautifully from windowsill experiments to productive home food systems.
Fresh salads year-round aren’t just possible—they’re easy with the Kratky Method. The time you invest learning this technique pays dividends in fresh food, reduced grocery bills, and the satisfaction of growing something with your own hands. Every meal featuring your homegrown greens reinforces why you started.

The journey from complete beginner to confident Kratky gardener takes just a few growing cycles. Each plant teaches valuable lessons. Each harvest proves that growing food doesn’t require a farm, a yard, or even soil. Just the willingness to try something new and learn as you grow.
Get your supplies together, mix your first nutrient solution, and place that first seedling. Your Kratky Method adventure begins with a single container. Where it leads depends only on how far you want to take it. The foundation you build with these simple passive systems can last a lifetime of fresh, homegrown food.