
You might think hydroponics sounds complicated or expensive. The truth is quite different. With basic materials from your local hardware store and about two hours of your time, you can build a functioning system for under $150. This guide walks you through every step of creating your first hydroponics setup, even if you have zero experience.
The beauty of hydroponics lies in its simplicity. Plants need three things to thrive: water, nutrients, and oxygen. Your DIY system will deliver all three directly to the plant roots. No green thumb required. Just follow along, and you will be harvesting fresh lettuce or herbs within weeks.
Understanding Hydroponics: The Basics You Need to Know

Hydroponics removes soil from the growing equation entirely. Instead of digging in dirt, your plants sit in an inert growing medium while their roots dangle in or receive regular doses of nutrient solution. This water contains all the minerals and nutrients plants would normally extract from soil.
The science behind this approach is straightforward. Plants absorb nutrients through their roots as dissolved minerals in water. Soil acts as a storage medium for these nutrients, but it is not essential for plant growth. By delivering nutrients directly through water, you give plants immediate access to everything they need.
Traditional gardening faces challenges hydroponics solves. Soil can harbor pests, diseases, and weeds. It requires significant space and proper drainage. Watering schedules vary based on weather and soil composition. Hydroponics eliminates most of these variables. You control the environment, which means more consistent results and fewer surprises.
Why Choose Hydroponics?
The benefits extend beyond just novelty. Hydroponic systems use up to 90% less water than soil gardens because water recirculates rather than draining away. Plants grow 25-30% faster since they receive optimal nutrition without expending energy searching for nutrients in soil. Space efficiency lets you grow vertically or in compact areas like apartments, balconies, or basements.

Year-round growing becomes possible indoors with proper lighting. No more waiting for spring or dealing with frost. You harvest fresh produce regardless of outdoor conditions. This consistency appeals to anyone tired of seasonal limitations or unpredictable weather patterns.
The setup you build today teaches fundamental principles applicable to more advanced systems later. Many commercial farms now use hydroponics for its efficiency and yield. Starting simple at home gives you hands-on experience with this growing agricultural trend.
Materials Needed for Your DIY Hydroponic System

Building your system requires specific components, but nothing exotic or hard to find. Most items come from hardware stores, pet supply shops, or online retailers. Shopping locally saves shipping time, though online options often cost less. Budget approximately $120-150 for your first complete setup.
Core System Components
The container holds your nutrient solution and serves as the foundation of your system. You need one food-grade plastic storage container with a lid, around 10-gallon capacity. Opaque or dark-colored containers prevent light from reaching the water, which stops algae growth. Clear containers work if you wrap them in black plastic or paint the exterior.
Net pots hold your plants and growing medium while letting roots grow through. Purchase six to eight 2-inch or 3-inch net pots depending on what you plan to grow. Smaller pots work fine for lettuce and herbs. Larger plants like tomatoes need 3-inch or bigger pots. These cost roughly $1-2 each or come in multi-packs for better value.
Growing medium replaces soil by anchoring plants and retaining some moisture. Several options work well. Clay pebbles (also called hydroton or expanded clay) are reusable and drain excellently. Rock wool cubes start seeds and transplant easily. Perlite is lightweight and inexpensive. Coconut coir is sustainable and holds moisture well. Choose based on availability and preference. A small bag costs $10-15 and lasts for multiple plantings.
Get the Right Growing Medium
Choosing quality growing medium makes a significant difference in your success. Clay pebbles offer the best drainage and reusability for beginners. Start with a proven option rather than experimenting with unknown materials.
Aeration and Water Circulation
An air pump with air stone keeps oxygen levels high in your nutrient solution. Plant roots need oxygen to function properly. Stagnant water quickly becomes oxygen-depleted, leading to root rot. Any aquarium air pump works perfectly. Look for one rated for your container size. Small pumps cost $10-20. The air stone diffuses air into tiny bubbles that dissolve oxygen into the water. These run $3-5.
Plastic tubing connects your air pump to the air stone. Standard aquarium tubing works fine. Buy a few extra feet in case you need to reposition components. A 10-foot roll costs around $5. Some systems also benefit from a water pump for active circulation, but the simple design in this guide relies on the air pump alone.
Lighting Equipment
Plants require light for photosynthesis. If your system sits near a sunny window with 6-8 hours of direct sunlight, you might skip artificial lighting. Most indoor setups need grow lights to provide adequate illumination. LED grow lights are energy-efficient and produce less heat than older fluorescent options.
A basic LED grow light panel or bulb suitable for a 2×2 foot area costs $30-60. Higher-end models include built-in timers and adjustable spectrum, but simple lights work fine for beginners. Position lights 6-12 inches above your plants and adjust height as they grow. Use a basic outlet timer ($10) to automate your lighting schedule if your light lacks this feature.

Nutrients and pH Management
Hydroponic nutrient solution feeds your plants everything they would normally get from soil. Buy a complete hydroponic nutrient kit containing all essential minerals. Liquid nutrients are easier to use than powder forms. General Hydroponics Flora series or similar products cost $20-30 for bottles that last months.
A pH test kit lets you monitor and adjust water acidity. Most plants prefer pH between 5.5 and 6.5. Hydroponic nutrients often shift pH as they dissolve. Test strips work but digital pH meters ($15-30) provide more accurate readings. pH adjustment solutions (pH up and pH down) cost $10-15 for both bottles. These last a long time since you use tiny amounts per adjustment.
Complete Nutrient Solution Starter Kit
New to hydroponics? A complete nutrient kit eliminates guesswork. These packages include balanced nutrients plus pH adjustment solutions, giving you everything needed for healthy plant growth from day one.
Seeds and Starting Supplies
Choose seeds suited for hydroponic growing. Leafy greens like lettuce, spinach, and kale grow fastest and easiest for beginners. Herbs such as basil, cilantro, and parsley also thrive. A seed packet costs $2-5 and contains far more seeds than you need initially.
Rock wool starter cubes or seed starting plugs help germinate seeds before transplanting into your system. These come in trays of 50-100 cubes for $10-15. Alternatively, start seeds in small pots with regular potting soil, then rinse roots clean before moving to net pots with clay pebbles.
Basic Tools
You need a few simple tools to assemble your system. A drill with a hole saw bit matching your net pot diameter cuts clean holes in the container lid. Hole saws cost $10-15. If you lack a drill, a sharp utility knife can cut holes, though this takes more effort and care. Silicone caulk ($5) seals holes for tubing if needed, though most setups do not require this.
Measuring cups and spoons help portion nutrients accurately. A small notepad to track nutrient additions and pH readings proves surprisingly useful. These simple records help you learn what works and troubleshoot problems.

Step-by-Step Assembly Instructions
Now comes the fun part – building your system. This process takes about two hours for first-timers. Work in a well-ventilated area with good lighting. Lay out all your materials before starting so everything is within reach.
Step 1: Prepare the Container and Lid
Clean your storage container and lid thoroughly with soap and water. Rinse several times to remove any soap residue. Let everything air dry completely. Even trace amounts of cleaning chemicals can harm sensitive plant roots.
Mark hole positions on the lid for your net pots. Space them evenly with at least 4-6 inches between centers. This prevents plants from crowding each other as they grow. Six net pots fit comfortably in most 10-gallon container lids. Use a ruler or measuring tape for accuracy.
Place the lid on scrap wood to protect your work surface. Drill holes using your hole saw. Go slowly and let the tool do the work. Forcing the bit can crack the plastic. The holes should fit your net pots snugly but allow you to lift them out easily. Test fit each pot before proceeding.

Step 2: Install the Air System
The air pump sits outside the container. This prevents accidental water damage and makes maintenance easier. Attach one end of your tubing to the air pump outlet. Cut tubing to reach from the pump into the container with a few extra inches to spare.
Connect the air stone to the other end of the tubing. This small cylinder or disc will sit at the bottom of your water reservoir. The air stone diffuses pressurized air into thousands of tiny bubbles, maximizing oxygen transfer to the water.
If your lid has no existing openings, drill a small hole (1/4 inch) for the air line to pass through. The hole should be near the edge of the lid to keep tubing away from plants. Thread the tubing through and position the air stone at the bottom center of the container. The tubing should have no kinks or sharp bends that might restrict air flow.
Step 3: Prepare and Position Net Pots
Rinse your growing medium thoroughly before use. Clay pebbles especially need good rinsing to remove dust. Place them in a colander or strainer and run water through until it runs clear. This prevents cloudy water in your system.
Fill each net pot about three-quarters full with growing medium. Leave room at the top for placing seedlings or seeds. The medium should fill the pot loosely, not packed tight. Roots need air spaces to grow through the material easily.
If transplanting established seedlings, create a small depression in the center of the medium. Gently place the seedling roots in this space and surround them with more medium. The plant crown (where stem meets roots) should sit just above the medium surface. For direct seeding, place 2-3 seeds on the medium surface and cover lightly with a thin layer of additional medium.

Step 4: Fill the Reservoir and Add Nutrients
Fill your container with clean water to about 2-3 inches below where the net pots will sit. This level lets roots reach water while providing air gap above the solution. Use room temperature water if possible. Very cold water can shock plants. Let tap water sit overnight if it contains chlorine, allowing the chemical to dissipate.
Following the directions on your nutrient package, measure and add the recommended amount for your water volume. Most nutrient solutions use a ratio like 5ml per gallon of water. Add nutrients gradually while stirring. The water may turn slightly cloudy or colored – this is normal.
Test pH after mixing nutrients. Dip your test strip in the solution or use your digital meter. Adjust if needed. If pH is too high, add a few drops of pH down solution. If too low, add pH up solution. Retest after each adjustment. Make small changes – it is easier to add more than to correct an overshooting adjustment.
Step 5: Assemble the Complete System
Place the lid on the container with net pots positioned in the holes. The bottoms of the net pots should touch or nearly touch the water surface initially. As plants grow and roots extend, you can lower the water level slightly, though maintaining some contact helps young plants establish.
Plug in your air pump and verify bubbles emerge from the air stone. You should see constant steady streams of fine bubbles rising through the water. Adjust the air flow if your pump has a control valve. More bubbles equal more oxygen, which generally benefits plants.
Position your grow lights above the system. Most LED lights should sit 6-12 inches from plant tops. Check the manufacturer specifications for your specific light. Connect the lights to your timer and set the schedule. Most plants thrive with 14-16 hours of light per day. A schedule like 6am-10pm works well.

Step 6: Plant or Transplant Seedlings
If starting from seeds in your system, place 2-3 seeds in each net pot on the growing medium surface. Cover lightly with more medium. Keep the medium moist by spraying with water daily until roots reach the reservoir below. Seedlings emerge in 5-7 days for most greens and herbs.
If transplanting seedlings started elsewhere, carefully remove plants from their starter containers. Gently rinse away soil or starter medium from roots under lukewarm running water. Be gentle – roots break easily. Place the cleaned roots through the net pot and surround with your chosen growing medium. The plant should sit stable with roots extending toward the reservoir.
For the first few days, seedlings may look stressed from transplanting. This is normal. They usually perk up within 3-5 days as roots adapt to the new environment. Keep lights on their full schedule and maintain proper water level.
Setup and Maintenance: Keeping Your System Thriving

Your system is running. Now comes the easy part – daily and weekly care that keeps plants healthy. Hydroponics requires consistent attention but takes less time than traditional gardening. A few minutes daily prevents problems before they start.
Daily Monitoring Tasks
Check water level every morning. Plants consume water at varying rates depending on size, growth stage, and environmental conditions. Top off the reservoir with fresh water as needed. During hot weather or rapid growth periods, you might add a half-gallon daily. Cooler conditions mean slower water consumption.
When adding water, mix in a proportional amount of nutrients. If your reservoir holds 8 gallons and you add 1 gallon of water, add one-eighth of your normal nutrient dose. This maintains consistent nutrition rather than letting the solution become diluted over time.
Observe plant appearance. Healthy hydroponic plants show vibrant green color and upward growth. Leaves should be firm, not wilted or discolored. Check for pests, though hydroponic systems encounter fewer pest problems than soil gardens. Look at roots if visible – they should be white or light tan, not brown or slimy.
Verify the air pump runs continuously. Listen for the steady hum and watch for bubbles in the water. If the pump stops, roots begin suffocating within hours. Keep a spare air pump on hand if possible, or at minimum have a backup plan for emergency aeration.
Weekly Maintenance Schedule
Test pH weekly at minimum. Even with careful management, pH drifts over time as plants consume nutrients. Most beginners find testing every 3-4 days gives better results until they understand their system’s patterns. Record each reading in your notepad. Patterns emerge that help predict when adjustment is needed.
Check nutrient strength using an electrical conductivity (EC) meter if you have one. These measure dissolved nutrients in parts per million (PPM). Different plants prefer different levels, but most leafy greens thrive around 800-1200 PPM. If you lack an EC meter, follow the weekly feeding schedule on your nutrient bottle instructions.
Clean the air stone monthly or when you notice reduced bubble output. Remove the stone and soak in white vinegar for 30 minutes. This dissolves mineral buildup that clogs the pores. Rinse thoroughly before reinstalling. Some growers keep two air stones and swap them monthly for uninterrupted operation.

Complete System Refresh
Every 2-3 weeks, completely change your nutrient solution. This prevents buildup of unused minerals and potential pathogens. Turn off the air pump and remove plants in their net pots. Set them in a shallow tray with a small amount of water to keep roots moist.
Empty the old solution down the drain or use it to water outdoor plants (it contains valuable nutrients). Rinse the reservoir thoroughly. Wipe down interior walls with a clean cloth. This removes any algae film or mineral deposits.
Refill with fresh water, add nutrients, and adjust pH. Return plants to their positions and restart the air pump. This complete refresh takes 20-30 minutes but dramatically improves plant health and growth rates.
Adjusting for Plant Growth
As plants grow larger, their roots extend deeper into the reservoir. You can gradually lower the water level to maintain the air gap between net pots and water surface. Roots need some exposure to air. Keeping net pot bottoms 1-2 inches above the water surface forces roots to grow longer and develop better structure.
Larger plants consume more nutrients and water. You might need to increase nutrient concentration slightly or top off water more frequently. Watch plant response rather than blindly following schedules. Healthy growth means your current regimen works. Slowed growth or yellowing leaves suggest adjustments are needed.
Harvest regularly once plants reach usable size. For lettuce and leafy greens, cut outer leaves while leaving the center growing point intact. This provides continuous harvest over weeks. Herbs benefit from frequent trimming, which encourages bushier growth. Regular harvesting prevents overcrowding and maintains good air circulation.
Free Troubleshooting Guide
Keep your hydroponic system running perfectly with our detailed troubleshooting checklist. This free PDF covers common issues and solutions specific to DIY systems. Download it now to have answers ready when questions arise.
Managing Light Exposure
Consistent light schedules matter more than most beginners realize. Plants respond to photoperiod (day length) for various growth processes. Stick to your timer settings. Random light schedule changes confuse plants and slow growth.
Adjust light height as plants grow taller. Maintain the recommended distance between light and plant tops. Lights too close can burn leaves. Lights too far result in leggy, stretched growth as plants reach for illumination. Compact, sturdy growth indicates proper lighting distance.
Clean light fixtures monthly. Dust and residue block light transmission. A quick wipe with a damp cloth maintains full light output. This simple task can increase light reaching plants by 10-15%.

Troubleshooting Tips: Solving Common Issues
Every grower encounters problems. Recognizing issues early and knowing solutions separates success from frustration. Most problems have simple fixes if caught quickly.
Algae Growth in the Reservoir
Algae appears as green slime on container walls or floating in water. Light reaching your nutrient solution causes this. Algae competes with plants for nutrients and oxygen. Small amounts are harmless, but heavy growth requires action.
Prevention beats treatment. Use opaque containers or wrap clear ones completely in black plastic. Cover any light gaps around net pots with aluminum foil or additional growing medium. Even small light leaks encourage algae. Check your system in a darkened room with a flashlight to spot these leaks.
For existing algae, drain the system during your next solution change. Scrub all surfaces with a dilute hydrogen peroxide solution (1 part 3% peroxide to 10 parts water). Rinse thoroughly before refilling. This kills algae without harming plants. Adding a small amount of hydrogen peroxide to your regular reservoir (3ml per gallon) prevents future outbreaks.
Yellowing Leaves (Nutrient Deficiency)
Yellow leaves indicate several possible problems. If lower, older leaves yellow while new growth stays green, your plants probably need more nitrogen. Increase nutrient concentration slightly. If new growth yellows while older leaves remain green, suspect iron deficiency. Check pH – improper pH prevents nutrient absorption even when nutrients are present.
Calcium and magnesium deficiencies show as yellowing between leaf veins while veins stay green. Complete hydroponic nutrients contain these minerals, but hard water areas sometimes have excess causing lockout. Using RO (reverse osmosis) or distilled water solves this, though it increases costs.
Most nutrient problems resolve within a week of correction. Severely damaged leaves will not recover, but new growth should appear healthy. Trim away damaged leaves so you can clearly see new growth response to your adjustments.

Root Rot and Brown Roots
Healthy roots appear white or cream-colored. Brown, slimy roots with foul odor indicate root rot. This bacterial or fungal condition kills plants if left unchecked. Low oxygen levels in water are the primary cause. Root rot spreads between plants sharing the same reservoir.
Immediately increase aeration. Add a second air stone if possible. Reduce water temperature – warm water holds less dissolved oxygen. If your growing area stays above 75°F, consider adding ice bottles to the reservoir daily. Commercial water chillers exist but cost significantly more than most DIY budgets allow.
Treat affected plants by removing from the system. Trim away brown roots with sterile scissors. Rinse remaining roots in 3% hydrogen peroxide. Let plants sit in a separate container with fresh water and peroxide (10ml per gallon) for 30 minutes. This sterilizes roots. Rinse again and return to the main system only if you see new white root growth within a few days.
Dump and sterilize the entire system if rot affects multiple plants. Clean everything with diluted bleach solution (1 tablespoon bleach per gallon of water). Rinse extensively – bleach residue kills plants. Wait 24 hours with the system running and filled with clear water before adding nutrients and plants.
Air Pump Failure
Pump failure is a crisis. Roots begin dying within 2-4 hours without oxygen. Keep a backup pump or have a emergency plan. Manual agitation works temporarily – stir the water vigorously every hour to add oxygen. This buys time to obtain a replacement pump.
Most pump failures result from clogged air stones or kinked tubing. Check these first. Clean or replace the air stone. Straighten tubing and ensure no furniture or equipment pinches it. If the pump makes noise but produces no air, the internal diaphragm likely failed. These pumps are not repairable – you need a replacement.
Power outages present similar problems. During extended outages, move plants temporarily to a sunny location in cups of water. This is not ideal but maintains them until power returns. Consider a battery backup for critical equipment if you experience frequent outages.
Slow or Stunted Growth
Plants grow slowly for several reasons. Insufficient light is most common. If your setup relies on window light, rotate plants daily for even exposure. Better yet, invest in proper grow lights. Plants need intense light for 14-16 hours daily.
Low nutrient levels also stunt growth. If you have been topping off with plain water for weeks, your solution is probably diluted. Perform a complete change with fresh nutrients. Alternatively, very high nutrient concentration burns roots and slows growth. When in doubt, dilute rather than concentrate.
Temperature extremes impact growth. Most vegetables prefer 65-75°F. Below 55°F, growth nearly stops. Above 85°F, plants experience stress. Monitor your growing area temperature and adjust as needed with fans, heating, or repositioning.

pH Swings
Rapidly changing pH frustrates beginners. Some swing is normal as plants absorb nutrients. Dramatic daily swings suggest problems. Very small reservoir volumes fluctuate more than larger ones. Upgrading to a bigger container helps stabilize pH.
Frequent partial solution changes prevent extreme swings. Instead of completely changing solution every 3 weeks, change half the solution weekly. This maintains fresher nutrients and more stable chemistry. pH buffers exist that can be added to solutions to resist swings, though most are unnecessary with proper management.
If pH consistently drops or rises to extremes within 24 hours, test your water source. Some municipal water has unusual chemistry. Consider using bottled water for one reservoir change. If problems disappear, your tap water was the culprit.
Ready-Made Solutions: Complete Starter Kits
Building from scratch teaches valuable lessons, but some people prefer ready-to-use solutions. Commercial hydroponic systems eliminate assembly and include everything you need. These kits cost more than DIY but save time and reduce beginner mistakes.

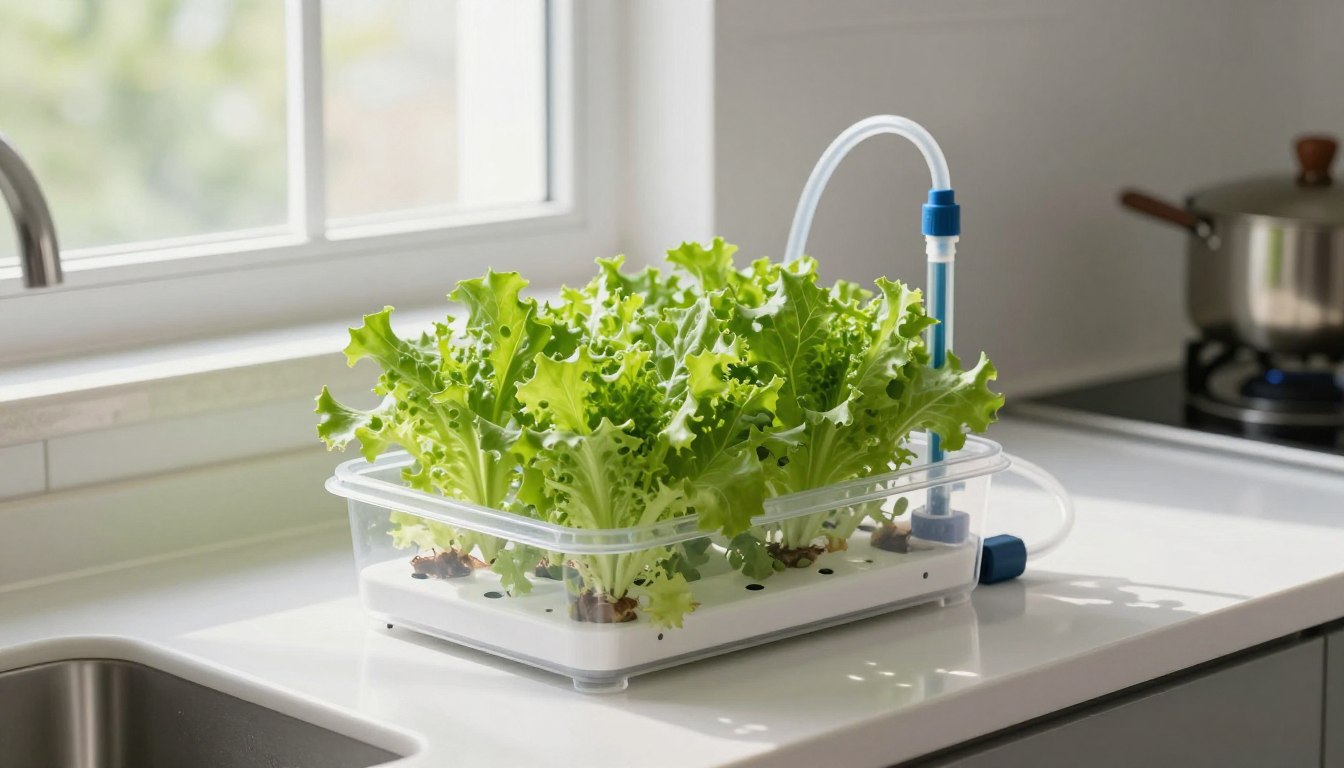
Countertop Hydroponic Gardens
These compact systems fit on kitchen counters and grow 3-9 plants. Perfect for herbs and small greens. Most include LED lights, automatic pumps, and foolproof instructions. Expect to pay $80-150 for quality units. Popular brands include AeroGarden and LetPot.
Advantages include minimal setup time and attractive appearance. Disadvantages are smaller growing capacity and higher per-plant cost compared to DIY. These work well for testing interest in hydroponics before committing to larger projects.

Single Bucket DWC Kits
Deep water culture (DWC) bucket kits provide everything for one large plant. Ideal for tomatoes, peppers, or other bigger crops. Kits include bucket, lid, net pot, air pump, and air stone. Prices range from $40-70.
These closely match the DIY system described in this guide but arrive pre-assembled. Good choice if drilling holes in containers intimidates you. Several bucket kits can connect together for multi-plant systems as your skills grow.

Vertical Tower Systems
Vertical towers maximize production in minimal floor space. These systems grow 20-40 plants in a footprint smaller than 2 square feet. Water pumps from a reservoir at the base and cascades down the tower. Costs run $200-400 for home models.
Best for experienced growers who have mastered basics. The vertical design requires more maintenance and attention to ensure even watering. Production per square foot far exceeds other methods when managed properly.
Whether you build or buy, the principles remain the same. Plants need water, nutrients, oxygen, and light. Any system providing these four elements will grow food. Start with what fits your budget, space, and confidence level. Success with a simple system naturally leads to experimentation with more advanced designs.
Best Plants for Your First Hydroponic System

Choosing the right plants for your first grow matters tremendously. Some crops are forgiving and fast-growing. Others demand precise conditions and patience. Start with easy plants to build confidence before attempting challenging varieties.
Lettuce: The Perfect First Crop
Lettuce tops every beginner recommendation list for good reasons. It grows incredibly fast in hydroponics – harvest leaves in 3-4 weeks from seed. It tolerates slightly imperfect conditions. It stays compact, fitting easily in small systems. Leaf lettuce varieties work better than head lettuce since you can harvest outer leaves continuously.
Try buttercrunch, red sails, or oak leaf varieties. Plant new seeds every two weeks for constant supply. Lettuce prefers cooler conditions (60-70°F) and moderate light. It rarely suffers from pests or diseases in clean hydroponic setups.
Herbs That Thrive Hydroponically
Basil grows vigorously in hydroponics. Pinch growing tips regularly to encourage bushy growth. Most basil varieties work, though Genovese and Thai basil are especially productive. Basil prefers warm conditions (70-80°F) and bright light.
Cilantro grows quickly but bolts (goes to seed) in warm conditions. Grow it in spring or fall, or keep it cooler if growing indoors. Harvest frequently to delay bolting. New plants from seed reach usable size in 3-4 weeks.
Mint grows so aggressively it can overwhelm other plants. Give it a dedicated net pot. Peppermint and spearmint varieties both work excellently. Harvest regularly to prevent it from taking over your system.
Parsley takes longer to germinate (2-3 weeks) but grows steadily once established. Both curly and flat-leaf types succeed in hydroponics. Parsley tolerates lower light than most herbs, making it suitable for less-than-ideal lighting situations.
Leafy Greens Beyond Lettuce
Spinach grows well hydroponically in cooler conditions. It provides heavy yields in small space. Harvest baby leaves or let plants mature fully. Spinach likes abundant nitrogen, so ensure nutrient levels stay adequate.
Kale varieties like Red Russian or Lacinato (dinosaur kale) produce for months. Start harvesting lower leaves once plants reach 8-10 inches tall. Kale tolerates temperature fluctuations better than lettuce, making it ideal for environments with inconsistent heating or cooling.

What to Avoid as a Beginner
Skip root vegetables like carrots, potatoes, and beets. These need soil-like medium and specialized systems. Fruiting plants like tomatoes, peppers, and cucumbers grow well hydroponically but demand larger systems, more nutrients, and greater expertise. Save these for your second or third system after mastering basics.
Avoid slow-growing plants like rosemary or lavender. While possible to grow hydroponically, the time investment before harvest tests beginner patience. Choose fast results for your first attempts to maintain enthusiasm.
Large, vining plants like melons or squash need extensive space and support structures. Their size and nutrient demands overwhelm small systems. Again, these are projects for experienced growers with dedicated setups.
Seed Starting Tips
Always buy seeds from reputable suppliers. Old or improperly stored seeds germinate poorly, wasting your time and effort. Look for seeds labeled for current year with “packed for” dates.
Start 2-3 seeds per net pot initially. Thin to the strongest single seedling once plants have 2-3 true leaves. This ensures at least one plant per position without overcrowding. Most seed packets contain far more seeds than needed for small systems. Store unused seeds in a cool, dry location for future plantings.
Keep detailed notes on what you plant and when. This simple habit helps you schedule successive plantings for continuous harvest. Note which varieties perform best in your specific setup. Your personalized experience becomes more valuable than any general guide as you gain practice.
Scaling Up: Next Steps in Your Hydroponic Journey

Success with your first system naturally leads to expansion thoughts. More plants mean more fresh food and greater satisfaction. Scaling up requires planning rather than just building bigger versions of your initial setup.
Expanding Your Current System
The easiest expansion adds more individual containers using the same design you have already mastered. Three or four separate systems provide variety – grow different plants in each at staggered planting times. Independent systems prevent disease spread and let you adjust nutrient concentrations for specific crops.
Connect multiple containers into one network by linking them with tubing. Water flows from a central reservoir through each growing container and returns. This approach shares a single pump and nutrient reservoir among many plants. The complexity increases but efficiency improves dramatically.
Consider a manifold system for the air pump. Special air valve blocks split one pump output into multiple air lines. This powers several containers from a single pump. Make sure your pump has sufficient capacity for the additional air stones. Undersized pumps cannot adequately oxygenate multiple containers.
Trying Different Hydroponic Methods
Your first system probably uses deep water culture (DWC) where roots sit in aerated water. Explore other methods once comfortable with basics. Ebb and flow systems periodically flood growing trays then drain back to a reservoir. Plants experience wet/dry cycles that some species prefer.
Nutrient film technique (NFT) flows a thin film of solution past roots suspended in channels. This method saves water and provides excellent oxygenation. It requires reliable pumps since any interruption quickly desiccates roots. Commercial operations favor NFT for its efficiency.
Drip systems deliver nutrient solution directly to each plant through emitters. This allows precise control over individual plants. Drip systems handle large plants better than DWC since roots are not submerged. The trade-off is increased complexity with multiple tubes and emitters to maintain.
Automating Your Setup
Automation reduces daily maintenance time. pH controllers automatically add pH adjustment solutions when levels drift. These cost $150-300 but eliminate daily pH checking. Similarly, nutrient dosing systems add fertilizer as concentration drops. High-end controllers monitor and adjust multiple parameters automatically.
WiFi-enabled controllers let you monitor systems remotely via smartphone. Check water levels, pH, temperature, and other factors from anywhere. Receive alerts if problems develop. These “smart” systems cost significantly more but provide peace of mind, especially for vacation absences.
Even simple automation helps. Float valves automatically refill reservoirs from a connected water source, similar to toilet tank mechanisms. This alone eliminates the most frequent maintenance task. Adding nutrients still requires manual intervention unless you install a complete automated dosing system.
Free System Design Consultation
Planning a larger hydroponic project? Get personalized advice from experienced growers. Our free 20-minute consultation helps you design the right system for your space, budget, and goals. Limited spots available monthly.
Growing Larger Crops
Tomatoes, peppers, and cucumbers require bigger systems with stronger light. A 5-gallon bucket per plant provides adequate root space. Support structures or cages hold plants upright as they grow. Flowering and fruiting plants need more phosphorus and potassium, so switch to bloom-phase nutrients when flowers appear.
Pollination becomes necessary for fruiting crops indoors. Most hydroponic beginners hand-pollinate using small brushes to transfer pollen between flowers. A small fan creating air movement helps with natural pollination if you grow enough plants to support pollinating insects.
Expect 3-4 months from seed to first ripe tomato hydroponically – faster than soil but still requiring patience. Tomatoes produce for many months with proper care, making the wait worthwhile. Choose determinate varieties (bush tomatoes) for compact growth or indeterminate types (vining tomatoes) if you have vertical space.

Joining the Hydroponic Community
Online forums and social media groups provide valuable resources. Experienced growers freely share advice, troubleshooting tips, and design ideas. Local hydroponic stores often host workshops or informal meetups. These connections accelerate your learning and provide ongoing support.
Document your grows with photos and notes. Sharing your experience helps other beginners while creating a record of your progress. Many growers find the community aspect as rewarding as the fresh produce itself.
Start Growing Today

You now have everything needed to build a functioning DIY Hydroponic System. This project takes one afternoon and opens the door to year-round fresh vegetables and herbs. The initial investment pays back through months of production from a single planting. More importantly, you gain practical knowledge of how plants grow and what they need to thrive.
Start simple with the basic system described in this guide. Choose easy crops like lettuce, basil, or spinach for your first grow. Master the fundamentals of water level management, pH adjustment, and nutrient feeding. These skills transfer to any hydroponic system regardless of size or complexity.
Do not let perfect be the enemy of good. Your first system will have quirks. You will make mistakes and learn from them. Every successful hydroponic grower started exactly where you are now – uncertain but willing to try. The difference between dreamers and growers is simply taking that first step.
Set up your system this weekend. Plant seeds or transplant seedlings. Within weeks, you will harvest fresh food you grew yourself using water, nutrients, and determination. The satisfaction of eating that first homegrown salad makes every bit of effort worthwhile. Welcome to the rewarding world of hydroponic gardening.
Ready to Begin Your Hydroponic Journey?
Everything you need to start growing is just a click away. Check out our curated selection of beginner-friendly components, complete kits, and helpful resources. Start harvesting fresh produce in just 3-4 weeks.