
Growing herbs indoors offers remarkable benefits beyond convenience. You’ll save money compared to buying fresh herbs weekly. You’ll enjoy aromatherapy benefits as fragrant plants fill your home. You’ll experience the quiet satisfaction of growing your own food, even in a small apartment.
The best part? Indoor herb gardens are remarkably forgiving. Most common culinary herbs are hardy plants that actually prefer the neglect of a busy household to obsessive overcare.
This guide walks you through everything you need to know. We’ll start with choosing the easiest herbs for beginners, then move through selecting the right location, containers, and soil. You’ll learn two simple ways to plant, establish a care routine that takes minutes per week, and harvest your herbs properly to encourage regrowth.
By the end of this article, you’ll have the confidence to start your first indoor herb garden this weekend. Let’s begin.
Step 1: Choose Your Herbs Wisely
Not all herbs are created equal when it comes to indoor growing. Some thrive indoors with minimal fuss. Others demand specific conditions that frustrate beginners.
Start with these seven beginner-friendly herbs. Each one forgives mistakes, grows relatively quickly, and provides delicious results.

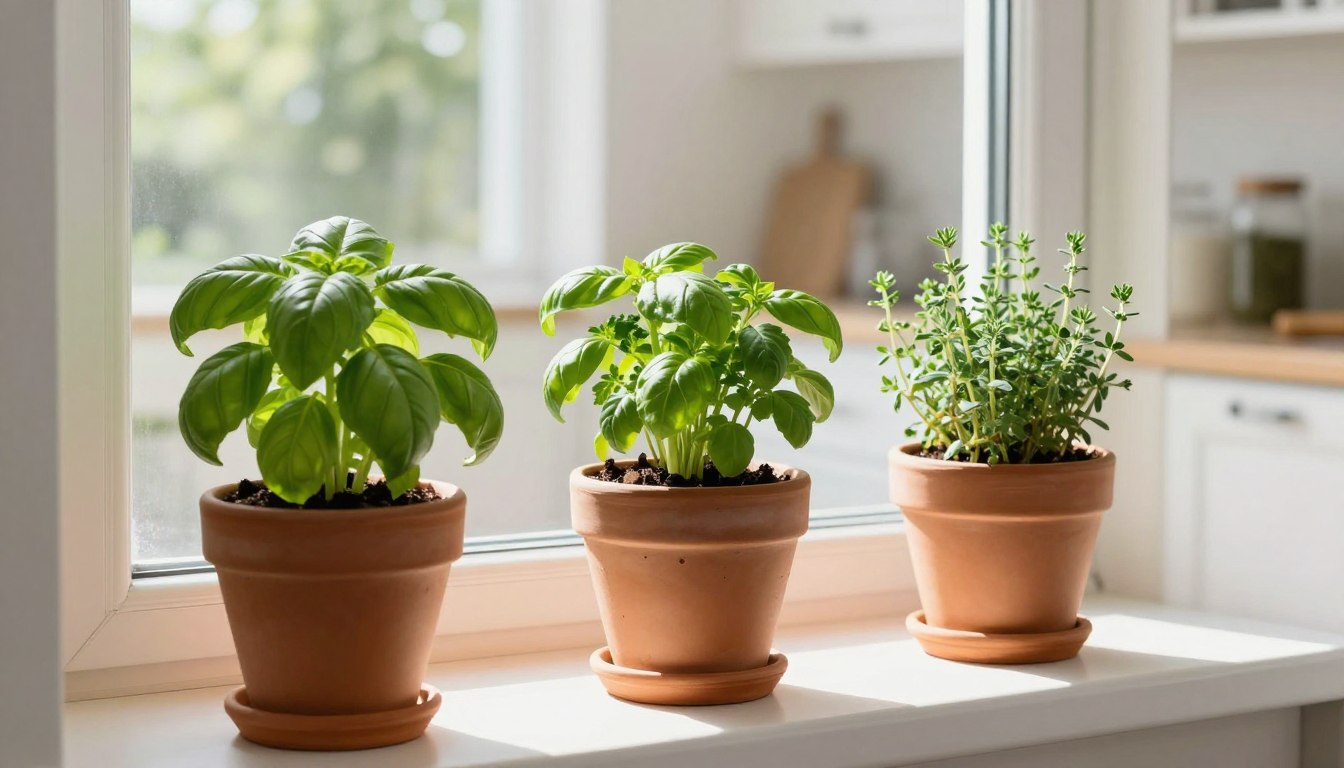
Basil: The Kitchen Superstar
Basil tops every beginner’s list for good reason. This herb grows fast, produces abundantly, and elevates countless dishes from pasta to pizza to Thai curry.
Basil prefers warm temperatures and bright light. Place it in your sunniest window. Water when the top inch of soil feels dry. Pinch off the top leaves regularly to encourage bushy growth and prevent flowering.
Sweet basil works beautifully for Italian cooking. Thai basil adds authentic flavor to Asian dishes. For small spaces, try spicy globe basil, a compact variety that stays under eight inches tall.
Mint: The Enthusiastic Grower
Mint grows so vigorously that outdoor gardeners often consider it invasive. Indoors, this enthusiasm becomes an advantage. Mint tolerates lower light than most herbs and bounces back quickly from harvesting.
This trailing herb works perfectly for mojitos, tea, or fresh garnishes. Keep the soil consistently moist. Mint likes humidity, making it ideal for kitchens where you cook frequently.
Peppermint offers classic cool flavor. Spearmint provides milder, sweeter taste. Chocolate mint adds unexpected depth to desserts.
Parsley: The Reliable Performer
Parsley grows steadily and produces for months. This biennial herb won’t flower in its first year, giving you extended harvest time. Both curly and flat-leaf varieties work well indoors.
Flat-leaf parsley delivers stronger flavor preferred by cooks. Curly parsley makes attractive garnishes. Both types tolerate partial shade better than basil, making them suitable for east or west-facing windows.
Water parsley regularly. This herb doesn’t like to dry out completely. Mist occasionally to increase humidity around the plant.
Chives: The Easy Option
Chives may be the single easiest herb to grow indoors. These grass-like plants tolerate temperature fluctuations, inconsistent watering, and lower light conditions. They’re nearly impossible to kill.
Snip chives from the top, leaving at least two inches of growth above the soil. The plant continues producing from the base. Chives add mild onion flavor to eggs, potatoes, soups, and salads.
This herb needs less water than most. Allow the soil to dry slightly between waterings. Chives prefer cool conditions, thriving in rooms that feel comfortable to humans.
Thyme: The Low-Maintenance Mediterranean
Thyme grows slowly but steadily with minimal intervention. This woody herb tolerates dry conditions and doesn’t mind if you forget to water occasionally. Thyme prefers six hours of bright light daily.
Common thyme suits most recipes. Lemon thyme adds citrus notes to chicken and fish. Creeping thyme works well in hanging containers where it can trail over edges.
Water thyme sparingly. Let the soil dry out between waterings. This Mediterranean native dislikes wet feet and prefers drier conditions than most indoor herbs.
Oregano: The Drought-Tolerant Choice
Oregano shares thyme’s preference for drier conditions and bright light. This spreading herb grows bushier when you harvest regularly. Oregano intensifies pasta sauces, pizza, and Mediterranean dishes.
Greek oregano delivers the strongest flavor. Italian oregano offers milder taste. Both varieties need less water than basil or mint. Allow soil to dry between waterings.
Trim oregano frequently to prevent it from becoming leggy. This encourages compact, bushy growth that produces more leaves for harvesting.
Cilantro: The Quick-Growing Option
Cilantro grows quickly but has a shorter lifespan than other herbs on this list. This annual herb bolts to seed faster indoors than outdoors. Plant new cilantro every few weeks for continuous supply.
Cilantro prefers cooler temperatures and can tolerate partial shade. This makes it suitable for rooms that stay around sixty-five degrees. Keep soil consistently moist but not waterlogged.
Harvest cilantro leaves from the outside of the plant, leaving the center to continue growing. Use both leaves and stems in cooking for maximum flavor.
Matching Herbs to Your Cooking Style
Choose herbs you actually use. If you cook Italian food weekly, prioritize basil and oregano. Love Asian cuisine? Start with Thai basil and cilantro. Enjoy simple preparations? Chives and parsley work in nearly everything.
Consider starting with just three herbs. This keeps care manageable while you learn. You can always expand your indoor garden later.

Ready to Start Growing?
Quality seeds make a difference for beginners. We recommend starting with organic, non-GMO seed collections specifically designed for indoor growing. These varieties have been selected for their adaptability to indoor conditions.
Step 2: Select the Right Location
Location determines success or failure for indoor herb gardens. Most herbs need significant light to thrive. Understanding your home’s light conditions helps you choose the best spot for your plants.

Understanding Light Requirements
Most culinary herbs evolved in Mediterranean climates with abundant sunshine. Indoors, these plants need six to eight hours of direct sunlight daily. Some herbs tolerate partial shade, but none truly thrive in low light without supplemental lighting.
South-facing windows provide the brightest, most consistent light in the Northern Hemisphere. These locations work best for sun-loving herbs like basil, oregano, and thyme. Place pots directly in the window or within two feet of the glass.
West-facing windows offer strong afternoon sun. This works well for most herbs, though the intense heat in summer might require moving plants back slightly from the glass.
East-facing windows provide gentle morning light. Herbs like parsley, chives, and mint tolerate these conditions better than basil or oregano. You’ll see slightly slower growth compared to brighter locations.
North-facing windows rarely provide sufficient light for herbs without supplementation. If this is your only option, invest in grow lights.
When Natural Light Isn’t Enough
Not everyone has south-facing windows or the right exposure. Low-light homes can still support thriving herb gardens with artificial lighting.
LED grow lights have revolutionized indoor gardening. Modern options consume little electricity, produce minimal heat, and provide the specific light spectrum plants need for photosynthesis.
Position grow lights six to twelve inches above your herbs. Run lights for fourteen to sixteen hours daily to simulate long summer days. Most herbs grow better under consistent artificial light than inconsistent natural light.
Look for full-spectrum LED grow lights rated between twenty and forty watts for small herb gardens. Adjustable height features let you raise the light as plants grow taller.
Pro Tip: Rotate pots one-quarter turn every few days. This prevents herbs from leaning toward the light source and encourages even, balanced growth on all sides of the plant.
Temperature and Humidity Considerations
Most herbs prefer room temperatures between sixty-five and seventy-five degrees Fahrenheit during the day. Slightly cooler nighttime temperatures around sixty to sixty-five degrees encourage healthy growth.
Avoid extreme temperature fluctuations. Don’t place herbs directly over heating vents, radiators, or air conditioning units. Keep them away from drafty exterior doors in winter.
Kitchen windowsills work wonderfully for herb gardens. Cooking activity creates natural humidity that many herbs appreciate. The warmth from cooking also keeps temperatures consistent.
Herbs like rosemary and basil prefer higher humidity than typical indoor environments provide. Increase humidity by grouping plants together, placing pots on pebble-filled trays with water, or using a small humidifier nearby.
Avoid placing herbs too close to cold windows in winter. The temperature differential between room air and cold glass can stress plants, even if they receive good light.
Space Planning for Growth
Consider mature plant size when selecting your location. Basil can grow eighteen inches tall and equally wide. Mint trails and spreads. Thyme stays compact but bushes outward.
Allow at least four inches between pots for air circulation. Good airflow prevents fungal diseases and pests. Crowded plants compete for light and create humid microclimates where problems thrive.
Vertical space matters too. Ensure you have room to adjust grow lights upward or move pots as needed. Herbs sometimes outgrow their initial location faster than beginners expect.

Ideal for South Windows
- Basil (all varieties)
- Oregano
- Thyme
- Rosemary
Works in East/West Windows
- Parsley
- Chives
- Cilantro
- Mint
Requires Grow Lights
- North-facing locations
- Windowless kitchens
- Basement spaces
- Dark apartments
Need Grow Lights?
For homes without adequate natural light, LED grow lights provide reliable, energy-efficient illumination. Look for full-spectrum options with adjustable height and timer functions for best results.
Step 3: Pick Your Containers and Potting Mix
Container selection impacts plant health more than most beginners realize. The right pot makes watering easier, prevents root problems, and gives herbs room to grow. The wrong container leads to waterlogged roots, stunted growth, or dried-out plants.
Essential Container Features
Drainage holes are non-negotiable. Herbs need water to drain freely through the bottom of containers. Without drainage, excess water accumulates around roots, leading to root rot and plant death.
Every container must have at least one drainage hole in the bottom. If you fall in love with a decorative pot without drainage, use it as an outer cachepot. Place your herb in a plastic nursery pot with drainage inside the pretty container.

Container size matters. Small pots dry out quickly and restrict root growth. Oversized pots hold too much water for small root systems. For most herbs, start with containers six to eight inches in diameter.
Individual pots for each herb work better than combining multiple herbs in one large container. Different herbs have different water needs. Basil wants consistent moisture while thyme prefers drier soil. Separate pots let you customize care for each plant.
Container Material Comparison
Terra cotta pots breathe beautifully. These classic clay containers allow air and moisture to move through their porous walls. This prevents overwatering and promotes healthy roots. However, terra cotta dries out quickly, requiring more frequent watering.
Glazed ceramic pots hold moisture longer than terra cotta. These attractive containers come in countless colors and styles. Choose glazed pots with drainage holes. The glazing prevents the pot from breathing, so drainage becomes even more critical.
Plastic pots are lightweight, inexpensive, and retain moisture well. They work perfectly for beginners. The main downside is appearance. Plastic containers lack the aesthetic appeal of ceramic or terra cotta, though you can place them inside decorative cachepots.
Self-watering containers include built-in water reservoirs that wick moisture to roots as needed. These systems work well for busy people or those who travel frequently. However, they’re more expensive and may encourage overwatering in beginners who don’t understand how they function.
Saucers and Drainage Management
Place saucers under all pots to protect surfaces from water damage. Empty saucers within fifteen minutes after watering. Allowing pots to sit in water defeats the purpose of drainage holes.
For windowsills, choose plastic or silicone saucers that won’t leave water rings on painted wood. Terra cotta saucers look beautiful but can sweat moisture through to furniture.
Add decorative stones or pebbles to saucers for visual interest. Just ensure stones don’t block drainage or hold water against pot bottoms.
The Right Potting Mix Makes All the Difference
Never use garden soil for indoor herbs. Outdoor soil compacts in containers, suffocating roots and creating drainage problems. It may also contain pests, disease organisms, or weed seeds.
Quality potting mix designed for containers provides the loose, well-draining structure herbs need. Look for products labeled “potting mix” or “potting soil” rather than “garden soil.”

The best potting mixes for herbs contain a blend of peat moss or coco coir, perlite or vermiculite, and sometimes compost. This combination holds moisture while allowing excess water to drain freely.
Avoid potting mixes that contain moisture-retaining crystals or excessive fertilizer. Herbs prefer leaner soil than flowering plants. Rich soil produces rapid growth but diluted flavor in herbs.
For Mediterranean herbs like oregano, thyme, and rosemary, consider adding extra perlite to improve drainage. Mix two parts potting mix with one part perlite for a grittier, faster-draining medium these herbs prefer.
DIY vs. Pre-Made Mix
Beginners should start with quality commercial potting mix. Creating custom soil blends requires understanding component ratios and proper sterilization. Pre-made mixes eliminate guesswork and come ready to use.
If you want to customize, wait until you’ve successfully grown herbs for a few months. Experience teaches you what adjustments your specific herbs and growing conditions need.
What to Look For
- Drainage holes in every pot
- Containers 6-8 inches diameter
- Lightweight potting mix (not garden soil)
- Mix containing perlite or vermiculite
- Individual pots per herb type
- Matching saucers for each container
What to Avoid
- Pots without drainage holes
- Garden soil or topsoil
- Containers too small (under 4 inches)
- Combining water-needy and drought-tolerant herbs
- Heavy clay pots for countertops
- Moisture-retaining crystals in mix
Complete Starter Kits Available
Save time with complete herb garden starter kits that include containers, potting mix, seeds, and instructions. These kits eliminate guesswork for beginners and ensure all components work well together.
Step 4: Planting Your Indoor Herb Garden
You’ve chosen your herbs, identified the perfect location, and gathered containers and soil. Now comes the exciting part – actually planting your indoor herb garden. You have two options: starting from seeds or beginning with young plants from a nursery.
Option A: Starting from Seeds (More Patience, More Satisfaction)
Growing herbs from seed takes longer but costs less. You’ll watch the entire life cycle from germination to harvest. This option appeals to patient gardeners who enjoy the full growing experience.

Fill your container to within half an inch of the rim with pre-moistened potting mix. Tap the pot gently on the counter to settle the soil without compacting it. The surface should be level and slightly loose.
Read seed packet instructions carefully. Different herbs have different requirements. Some seeds need light to germinate and should barely be covered. Others prefer darkness and need to be buried deeper.
For most herbs, plant seeds one-quarter inch deep. Space seeds evenly across the soil surface, allowing about one inch between seeds. You’ll thin seedlings later, so don’t worry about perfect spacing now.
Cover seeds lightly with potting mix. Gently press the soil surface with your palm to ensure good seed-to-soil contact. This helps seeds absorb moisture and signals them to germinate.
Water gently using a spray bottle or watering can with a fine rose. You want to moisten the soil thoroughly without washing seeds away or creating puddles. The surface should look damp but not soaked.
Cover pots with plastic wrap or clear plastic domes to create a mini greenhouse. This maintains humidity while seeds germinate. Place covered pots in a warm location with indirect light.
Check daily for germination. Most herb seeds sprout within seven to fourteen days. Remove plastic covering as soon as you see green shoots emerging. Move sprouted seedlings into bright light immediately.
Thinning Seedlings
Once seedlings develop their second set of true leaves, thin them to the strongest plants. True leaves look different from the first rounded seed leaves. They have the characteristic shape of the mature herb.
Leave only one or two seedlings per six-inch pot. This feels wasteful but gives remaining plants room to develop strong root systems. Snip unwanted seedlings at soil level with scissors rather than pulling them out, which disturbs roots of neighboring plants.
Option B: Starting with Nursery Seedlings (Faster, Easier for Beginners)
Buying young herb plants from a garden center or grocery store gives you a significant head start. You’ll harvest herbs within two to three weeks instead of waiting six to eight weeks for seeds to mature.
This option costs more per plant but eliminates germination uncertainty. It’s the recommended approach for absolute beginners or those who want fresh herbs quickly.

Select healthy-looking plants with vibrant green leaves and compact growth. Avoid herbs with yellowing leaves, brown spots, or leggy stretched stems. Inspect the undersides of leaves for pests before purchasing.
Many grocery stores sell herb plants in small pots in the produce section. These often work better than large bushy plants from garden centers. Smaller plants adapt more easily to new growing conditions.
When you get plants home, let them acclimate for a day or two before transplanting. This reduces shock from environmental changes. Place them in their permanent location so they adjust to the light conditions.
Transplanting Nursery Herbs
Water the plant in its nursery pot several hours before transplanting. This helps the root ball hold together when you remove it from the container.
Fill your new container one-third full with potting mix. Remove the herb from its nursery pot by tipping it upside down while supporting the plant stem between your fingers. Tap the bottom of the pot to release the root ball.
Gently loosen roots on the outside of the root ball. If roots circle the outside densely, tease them apart with your fingers. This encourages roots to grow outward into new soil rather than continuing to circle.
Place the root ball in the new container. The top of the original root ball should sit about half an inch below the pot rim. Add or remove soil underneath to adjust height as needed.
Fill around the root ball with additional potting mix. Firm soil gently with your fingers to eliminate air pockets. Leave a half-inch gap between the soil surface and pot rim for watering.
Water thoroughly until water drains from the bottom of the pot. This settles soil around roots and eliminates remaining air pockets. Place the pot in its permanent location.
Post-Planting Care
Newly planted herbs need consistent attention for the first two weeks while they establish. Keep soil evenly moist but not waterlogged. Check daily by sticking your finger into the soil.
Avoid fertilizing for at least two weeks after planting. Let herbs adjust to their new home before adding nutrients. Commercial potting mixes contain enough nutrients to support plants for several weeks.
Don’t harvest from herbs during the first two weeks after planting. Give plants time to recover from transplant shock and establish strong root systems. Patience now leads to more abundant harvests later.
Quick Start Tip: Can’t decide between seeds and seedlings? Try both! Start some herbs from seed to learn the process while buying a few nursery plants for immediate use. This gives you the best of both approaches.
Step 5: Daily and Weekly Care Routine
Successful herb growing comes down to consistent, simple care. You don’t need complicated schedules or expensive products. Just master three basic tasks: watering correctly, feeding occasionally, and pruning regularly.
Watering: The Most Important Skill
More indoor herbs die from incorrect watering than all other causes combined. Too much water drowns roots. Too little water stresses plants. Learning to water correctly separates successful herb gardeners from frustrated beginners.
The finger test is your most reliable tool. Stick your index finger into the soil up to the second knuckle. If soil feels dry at your fingertip, water. If it feels damp, wait another day.

Different herbs have different water preferences. Basil and mint like consistently moist soil. Thyme and oregano prefer drier conditions. This is why separate pots for each herb work better than combining multiple herbs in one container.
When you water, water thoroughly. Pour water slowly over the entire soil surface until it drains from the bottom. This ensures moisture reaches all roots. Shallow watering creates shallow root systems.
Empty saucers fifteen minutes after watering. Never let pots sit in standing water. This recreates the conditions that cause root rot in over-watered plants.
Water needs change with seasons. Herbs use more water during summer when light is intense and growth is rapid. Winter watering frequency often decreases by half as growth slows and light diminishes.
Signs of Watering Problems
Wilting leaves suggest either too much or too little water. Check soil moisture before watering wilted plants. If soil is bone dry, water thoroughly. If soil is damp or wet, you’re overwatering.
Yellow lower leaves often indicate overwatering. Brown, crispy leaf edges suggest underwatering. Healthy herbs have uniformly green leaves with no discoloration.
Consistently overwatered herbs develop root rot. Roots turn brown and mushy instead of firm and white. Severely rotted roots smell bad. This condition is often fatal.
Feeding Your Herbs
Herbs need fewer nutrients than flowering plants or vegetables. Light feeding produces the best flavor. Excessive fertilizer creates lush growth but dilutes the essential oils that give herbs their distinctive taste.
Wait four to six weeks after planting before fertilizing. Potting mix contains enough nutrients to support young plants initially. Early feeding can burn tender roots.
Use liquid fertilizer at half the strength recommended on the label. Choose balanced fertilizers with equal nitrogen, phosphorus, and potassium numbers, such as 10-10-10 or 5-5-5.

Feed established herbs once monthly during spring and summer growing seasons. Reduce feeding to once every six to eight weeks during fall and winter when growth slows.
Fish emulsion and seaweed-based fertilizers work beautifully for herbs. These organic options provide gentle nutrition and trace minerals. They smell strongly for a few hours after application but won’t harm plants if you over-apply slightly.
Skip fertilizing if herbs look stressed or unhealthy. Address watering or light issues first. Adding nutrients to struggling plants often makes problems worse.
Pruning and Pinching for Bushier Growth
Regular pruning transforms leggy, sparse herbs into full, bushy plants that produce abundant leaves for harvesting. Pinching takes seconds and dramatically improves plant appearance and productivity.
Pinch growing tips on basil, mint, and oregano every week or two. Remove the newest, smallest leaves at the end of each stem. This forces the plant to branch below the pinch point, creating two stems where one grew before.
Continue this process throughout the growing season. Each pinch creates more branches. More branches mean more leaves to harvest and denser, more attractive plants.
Remove flower buds as soon as they appear on basil, cilantro, and parsley. Flowering signals these plants to stop leaf production and focus on seed formation. Removing flowers redirects energy back to leaf growth.
Some herbs, like chives and thyme, don’t require regular pinching. These plants naturally grow in clumps or spread horizontally. Simply harvest as needed to encourage continued growth.
Daily Quick-Check Routine
Develop a daily herb garden inspection habit. This takes less than a minute but catches problems early when they’re easiest to solve.
Check soil moisture with the finger test. Observe leaf color and overall appearance. Look for pests on leaf undersides. Rotate pots slightly to ensure even light exposure. These small daily actions prevent big problems.
Weekly Tasks
- Water as needed based on soil moisture
- Pinch growing tips on bushy herbs
- Remove any yellow or damaged leaves
- Check for pests under leaves
- Rotate pots one-quarter turn
Monthly Tasks
- Feed with diluted liquid fertilizer
- Clean dust from leaves with damp cloth
- Check drainage holes for clogs
- Assess whether plants need larger pots
- Trim back overgrown herbs
Step 6: Harvesting Your Herbs
The reward for weeks of care arrives when you harvest fresh herbs for cooking. Proper harvesting encourages continued growth and extends your plant’s productive life. Incorrect harvesting weakens plants or stops production entirely.
Wait until herbs reach at least six inches tall before the first harvest. Young plants need time to establish strong root systems. Premature harvesting stresses plants before they’re ready to handle it.

Harvesting Bushy Herbs: Basil, Mint, Oregano
For branching herbs like basil, mint, and oregano, harvest from the top down. This mimics the pinching technique and encourages bushier growth.
Identify where you want the plant to branch. Find a set of leaves about one-third down from the growing tip. Cut or pinch the stem just above these leaves, removing the entire top section.
The plant will produce two new stems from buds just above where you cut. These new stems grow out and up, creating a fuller plant. Each subsequent harvest continues this branching pattern.
Never remove more than one-third of the plant’s total foliage at one time. Taking too much stresses the plant and slows regrowth. Make smaller, frequent harvests rather than one large cutting.
Harvest these herbs in the morning after dew has dried but before afternoon heat. This is when essential oil content peaks, giving you the most flavorful leaves.
Harvesting Grass-Like Herbs: Chives
Chives grow from the base, so harvest them differently. Use clean scissors to cut leaves about two inches above the soil level. Cut outer leaves first, leaving inner new growth to continue developing.
Don’t pull or tear chive leaves. This damages the plant and can pull roots from the soil. Clean cuts heal quickly and don’t stress the plant.
You can harvest up to half of a chive plant at once without harm. The plant quickly regrows from the base. Regular cutting actually encourages more vigorous growth.
Harvesting Woody Herbs: Thyme, Rosemary
Thyme and rosemary grow on woody stems that don’t regenerate like basil or mint. Harvest carefully to avoid cutting into old wood that won’t produce new growth.
For thyme, trim the newest, softest stems at the tips. Leave older, woody growth intact. Cut just above a leaf node where new stems can develop.
Rosemary grows slowly, so harvest sparingly from young plants. Once established, you can trim stems up to four inches long. Always leave at least two-thirds of the plant intact.
These herbs have stronger flavor in shorter stems. Harvest six-inch sprigs rather than long branches for the best taste and to maintain plant shape.
Harvesting Parsley and Cilantro
Parsley and cilantro grow from a central crown. Harvest outer stems first, leaving the center to continue producing new growth.
Cut entire stems at the base near the soil line rather than picking individual leaves. This keeps plants tidy and removes stems that would otherwise become tough and bitter.
These herbs produce new stems from the center continuously. As long as you leave the center intact, the plant will keep growing. Once they bolt to flower, leaf production stops and flavor becomes bitter.
Storing Fresh Herbs
Use fresh herbs immediately for best flavor. If you harvest more than you need, store them properly to extend freshness.
Treat soft herbs like basil, cilantro, and parsley like cut flowers. Trim stem ends and place in a glass of water on the counter. Cover loosely with a plastic bag. Change water daily. These herbs stay fresh for up to a week.
Store hardy herbs like thyme, rosemary, and oregano wrapped in a damp paper towel inside a plastic bag in the refrigerator. They’ll keep for one to two weeks.
Freeze excess herbs for longer storage. Chop herbs and mix with olive oil. Freeze in ice cube trays. Pop out cubes and store in freezer bags for up to six months. These work perfectly for cooked dishes.
Basil Harvesting
Pinch from the top, just above a set of leaves. Harvest before flowers form for best flavor. Take no more than one-third at a time.
Chives Harvesting
Cut with scissors two inches above soil. Harvest outer leaves first. Can remove up to half the plant safely.
Thyme Harvesting
Trim soft, new growth from tips. Avoid cutting into old wood. Leave two-thirds of plant intact.
Flavor Peak: Herb flavor is strongest just before flowers open. This is when essential oil concentration peaks. Harvest regularly to prevent flowering and maintain flavor intensity.
Common Problems and Simple Solutions
Even with excellent care, herbs occasionally develop problems. Recognizing issues early and addressing them promptly prevents minor setbacks from becoming plant-killing disasters.

Yellow Leaves
Lower leaves turning yellow while upper leaves stay green usually indicates overwatering or poor drainage. Check soil moisture before watering. Ensure drainage holes aren’t clogged. Let soil dry out more between waterings.
Uniform yellowing across the entire plant suggests nutrient deficiency. Feed with diluted liquid fertilizer. This problem rarely occurs in the first few months after planting in fresh potting mix.
Yellow leaves plus stunted growth often means insufficient light. Move plants to a brighter location or add supplemental grow lights.
Leggy, Stretched Growth
Herbs growing tall with widely-spaced leaves and thin stems need more light. The plant stretches toward available light, creating weak, unattractive growth.
Move plants closer to windows or add grow lights. Pinch back leggy growth to encourage bushier, more compact form. Increased light prevents the problem from recurring.
Some legginess is normal in winter when daylight hours decrease and light intensity weakens. Accept slower, somewhat stretched growth or supplement with artificial lighting.
Brown, Crispy Leaf Tips
Dry, brown leaf edges indicate underwatering or low humidity. Check soil moisture more frequently. Water more thoroughly when soil feels dry.
If watering is adequate, increase humidity around plants. Group pots together, place on pebble trays with water, or run a humidifier nearby.
Brown tips can also signal fertilizer burn from too much plant food. If you’ve fertilized recently, flush soil by watering thoroughly until water runs freely from drainage holes. Skip the next scheduled feeding.
Wilting Despite Moist Soil
Plants that wilt when soil is wet likely have root rot from overwatering. Remove plant from pot and inspect roots. Healthy roots are white or tan and firm. Rotted roots are brown, mushy, and may smell bad.
Trim away rotted roots with clean scissors. Repot in fresh, dry potting mix. Water less frequently going forward. Severely rotted plants rarely recover and should be replaced.
Pests: Aphids and Spider Mites
Aphids are tiny green, black, or white insects that cluster on new growth and leaf undersides. They suck plant sap, causing distorted leaves and sticky residue.
Spray aphids off with a strong stream of water from the sink. Repeat every few days until they’re gone. For stubborn infestations, spray with insecticidal soap following label directions.
Spider mites create fine webbing between leaves and stems. These microscopic pests cause stippled, yellowing leaves. They thrive in dry conditions.
Increase humidity around plants to discourage spider mites. Spray affected plants with water daily. For serious infestations, use insecticidal soap or neem oil spray.
Herbs Won’t Grow or Grow Very Slowly
Slow growth in winter is normal. Reduced daylight and lower light intensity naturally slow herb growth. Accept this seasonal pattern or provide supplemental lighting.
Pot-bound roots restrict growth. If roots circle densely around the outside of the root ball or grow through drainage holes, transplant to a larger container.
Cold temperatures slow growth significantly. Most herbs grow best between sixty-five and seventy-five degrees. Check that herbs aren’t too close to cold windows or in cold drafts.
| Problem | Possible Cause | Solution |
| Yellow lower leaves | Overwatering or poor drainage | Reduce watering frequency, check drainage holes |
| Leggy stretched stems | Insufficient light | Move to brighter location or add grow lights |
| Brown crispy leaf tips | Underwatering or low humidity | Water more thoroughly, increase humidity |
| Wilting with wet soil | Root rot from overwatering | Check roots, trim rotted parts, repot in fresh soil |
| Sticky leaves or distorted growth | Aphid infestation | Spray with water, use insecticidal soap if needed |
| Stippled yellow leaves with webbing | Spider mites | Increase humidity, spray daily, use neem oil |
Ready for More? Complete Indoor Garden Systems
Once you’ve mastered basic herb growing, you might want to explore all-in-one indoor garden systems. These self-contained units eliminate guesswork with built-in lights, automatic watering, and sometimes even smartphone apps.
These systems cost more than traditional pots but offer maximum convenience. They’re ideal for busy people, those without adequate natural light, or anyone who wants foolproof results.

What These Systems Offer
Complete indoor garden systems include everything you need in one package. Most feature hydroponic growing where roots sit in nutrient solution instead of soil. This accelerates growth compared to traditional potting methods.
Built-in LED grow lights provide optimal spectrum and intensity for herb growth. Lights operate on automatic timers, turning on and off without your intervention. You can place these systems anywhere in your home regardless of natural light availability.
Automated watering systems reduce maintenance to refilling a reservoir every week or two. Some units alert you via indicator lights or smartphone notifications when water runs low.
Pre-seeded pod systems eliminate the need to purchase separate seeds or starter plants. Pop pods into slots, add water and nutrients, and watch herbs grow. Pods contain everything plants need including growth medium and seeds.
Popular System Comparisons

AeroGarden Harvest Elite
The AeroGarden Harvest Elite accommodates six pods and features a digital control panel with vacation mode. The system promises germination within seven to fourteen days with included gourmet herb seed pods.
The extendable LED light arm adjusts up to twelve inches as plants grow. Water level indicators and nutrient reminders take guesswork out of maintenance.

Click & Grow Smart Garden
Click & Grow’s compact three-pod system fits easily on kitchen counters or windowsills. The slim design takes minimal space while providing all necessary growing conditions.
Smart soil pods come pre-seeded with nutrients built in. Just add water every few weeks. The system operates silently with no pumps or fans. Over fifty herb and vegetable varieties are available.

iDOO Hydroponics System
The iDOO system offers twelve growing spots at a budget-friendly price. Two growing modes optimize light for herbs versus vegetables and flowers.
This system requires you to provide your own seeds, giving complete control over what you grow. The water circulation pump keeps nutrients flowing to roots. Adjustable height accommodates plants up to fifteen inches tall.
Are Complete Systems Worth the Investment?
Complete systems eliminate most common beginner mistakes. Automated lighting and watering remove the two factors that kill most indoor herbs. If you’ve struggled with traditional methods, these systems often succeed where pots and windowsills fail.
However, they’re not necessary for success. Many people grow beautiful herbs using basic containers, quality soil, and attention to watering. Start with traditional methods unless you know you need the automation these systems provide.
Complete systems also lock you into proprietary seed pods or nutrients in some cases. This increases ongoing costs compared to buying seeds and fertilizer yourself. Research replacement pod availability and costs before investing in any system.
Your Indoor Herb Garden Journey Starts Now
You now have everything you need to start growing fresh herbs indoors. You understand which herbs work best for beginners, where to place them for adequate light, and how to choose containers and soil that support healthy growth.
You know the two approaches to planting – starting from seeds or buying young plants – and the advantages of each method. You’ve learned the simple care routine that keeps herbs thriving: checking soil moisture, feeding monthly, and pinching for bushier growth.

Most importantly, you understand that growing herbs indoors isn’t complicated. It doesn’t require special skills or a green thumb. It simply requires understanding what plants need and providing those basics consistently.
Start small if you feel overwhelmed. Choose three herbs you use regularly in cooking. Get three six-inch pots with drainage holes. Fill them with quality potting mix. Buy young plants from the nursery or grocery store. Place them in your sunniest window.
Water when soil feels dry. Pinch growing tips occasionally. Harvest and enjoy your herbs. That’s the entire process.
You will make mistakes. Every gardener does. A plant might die. Seeds might not germinate. You might overwater or underwater. These experiences teach you more than success ever could.
Each herb you grow successfully builds confidence for the next one. Each harvest rewards your effort with flavors that grocery store herbs can’t match. Each time you clip basil for dinner instead of buying a plastic clamshell that will go bad before you use it all, you’ll appreciate the convenience of your indoor garden.
The hardest part is starting. Choose your herbs this weekend. Gather your supplies. Plant your first indoor herb garden. Three months from now, you’ll wonder why you waited so long.
Fresh herbs transform ordinary meals into something special. They elevate your cooking, improve your kitchen’s atmosphere, and provide the quiet satisfaction of growing something with your own hands.
Your indoor herb garden is waiting. Start growing.
Download Your Free Herb Garden Checklist
Want a printable reference guide? Get our free “First-Timer’s Indoor Herb Garden Checklist” with step-by-step setup instructions, care reminders, and troubleshooting tips. Perfect for beginners!
Frequently Asked Questions
How much light do indoor herb gardens need?
Most herbs need six to eight hours of direct sunlight daily. South-facing windows provide the best natural light. East or west-facing windows work for herbs that tolerate partial shade like parsley and chives. Without adequate natural light, use LED grow lights positioned six to twelve inches above plants for fourteen to sixteen hours daily.
Which herbs are easiest for beginners to grow indoors?
Basil, chives, mint, and parsley are the easiest herbs for beginners. Basil grows quickly and produces abundantly. Chives tolerate varying conditions and are nearly impossible to kill. Mint grows enthusiastically with minimal care. Parsley grows steadily and produces for months without flowering.
How often should I water my indoor herbs?
Water when the top inch of soil feels dry to your finger. This varies by herb type, pot size, temperature, and humidity. Basil and mint need more frequent watering than thyme or oregano. Most herbs need watering every two to three days in summer and once weekly in winter. Always check soil moisture rather than following a fixed schedule.
Can I use regular garden soil for indoor herbs?
No, never use garden soil for indoor herbs. Garden soil compacts in containers, suffocating roots and preventing proper drainage. It may also contain pests, diseases, or weed seeds. Always use quality potting mix specifically designed for containers. These mixes provide the loose, well-draining structure herbs need to thrive indoors.
How long does it take herbs to grow from seed?
Most herb seeds germinate within seven to fourteen days. Plants reach harvestable size in four to six weeks depending on the herb and growing conditions. Basil grows fastest, often ready to harvest in four weeks. Parsley and thyme take longer, requiring six to eight weeks. Starting with nursery plants gives you a four to six week head start.
Do indoor herbs need fertilizer?
Yes, but lightly. Feed established herbs once monthly during spring and summer with liquid fertilizer diluted to half the recommended strength. Reduce feeding to every six to eight weeks during fall and winter. Wait four to six weeks after planting before the first feeding. Excessive fertilizer creates rapid growth but dilutes herb flavor.
Why are my herbs getting leggy and stretched out?
Leggy growth indicates insufficient light. Herbs stretch toward available light, creating tall stems with widely spaced leaves. Move plants closer to windows or add grow lights. Pinch back leggy stems to encourage bushier, more compact growth. Increased light prevents the problem from recurring.
Can I grow different herbs together in one pot?
It’s possible but not recommended for beginners. Different herbs have different water needs. Basil likes consistently moist soil while thyme prefers drier conditions. Combining them in one pot makes proper watering difficult. Separate pots allow you to customize care for each herb’s specific requirements and lead to healthier plants.
What should I do if my herb plant flowers?
Remove flower buds immediately on basil, cilantro, and parsley. Flowering signals these plants to stop leaf production and focus on seed formation. Pinch off flower buds as soon as they appear to redirect energy back to leaf growth. This extends your harvest period and maintains leaf flavor and tenderness.
How do I know when to harvest my herbs?
Wait until herbs reach at least six inches tall before the first harvest. Harvest in the morning after any dew has dried but before afternoon heat. Take no more than one-third of the plant at one time. For bushy herbs like basil, cut from the top just above a set of leaves. For chives, cut outer leaves two inches above soil level.